


It's difficult to get good footage unless you have crystal clear water, but the Chasing M2 itself is well-built and easy to control. Without additional sensors though, it's tricky to navigate the murky depths.
- Brand: Chasing
- Camera: 4k UHD EIS
- App: Chasing GO1
- Speed: 3 Knots
- Weight: 10lbs
- Range: Dive 330ft
- Connectivity: Wi-Fi & Tether Cable
- Battery: Swappable 97.68WH lithium
- First-Person View (FPV): Via App
- Precise controls
- Great build quality
- Powerful lights ensure you can still film at a good depth
- Difficult to navigate without positional feedback
- Phone holder is not secure
- Carrying case is overly bulky
- Takes a lot of clean-up to put away
If your friend told you they just got a drone, you’d probably think of the flying kind, right?
It's no surprise. With their falling prices, smarter technology as well as more intuitive controls and setup, consumer drones have become more accessible to the masses. DJI, the leading brand of making consumer aerial drones, has one for every budget now. It's not just a fad either, Insider Intelligence predicts 29 million consumer drone shipments by end of 2021.
But what you wouldn’t likely guess, is how this drone segment isn’t just made up of the flying kind. In fact, a growing percentage is emerging from the deep seas. Turns out your friend from earlier is actually a bigger fan of The Beatles than flying and just bought a Yellow Submarine instead.
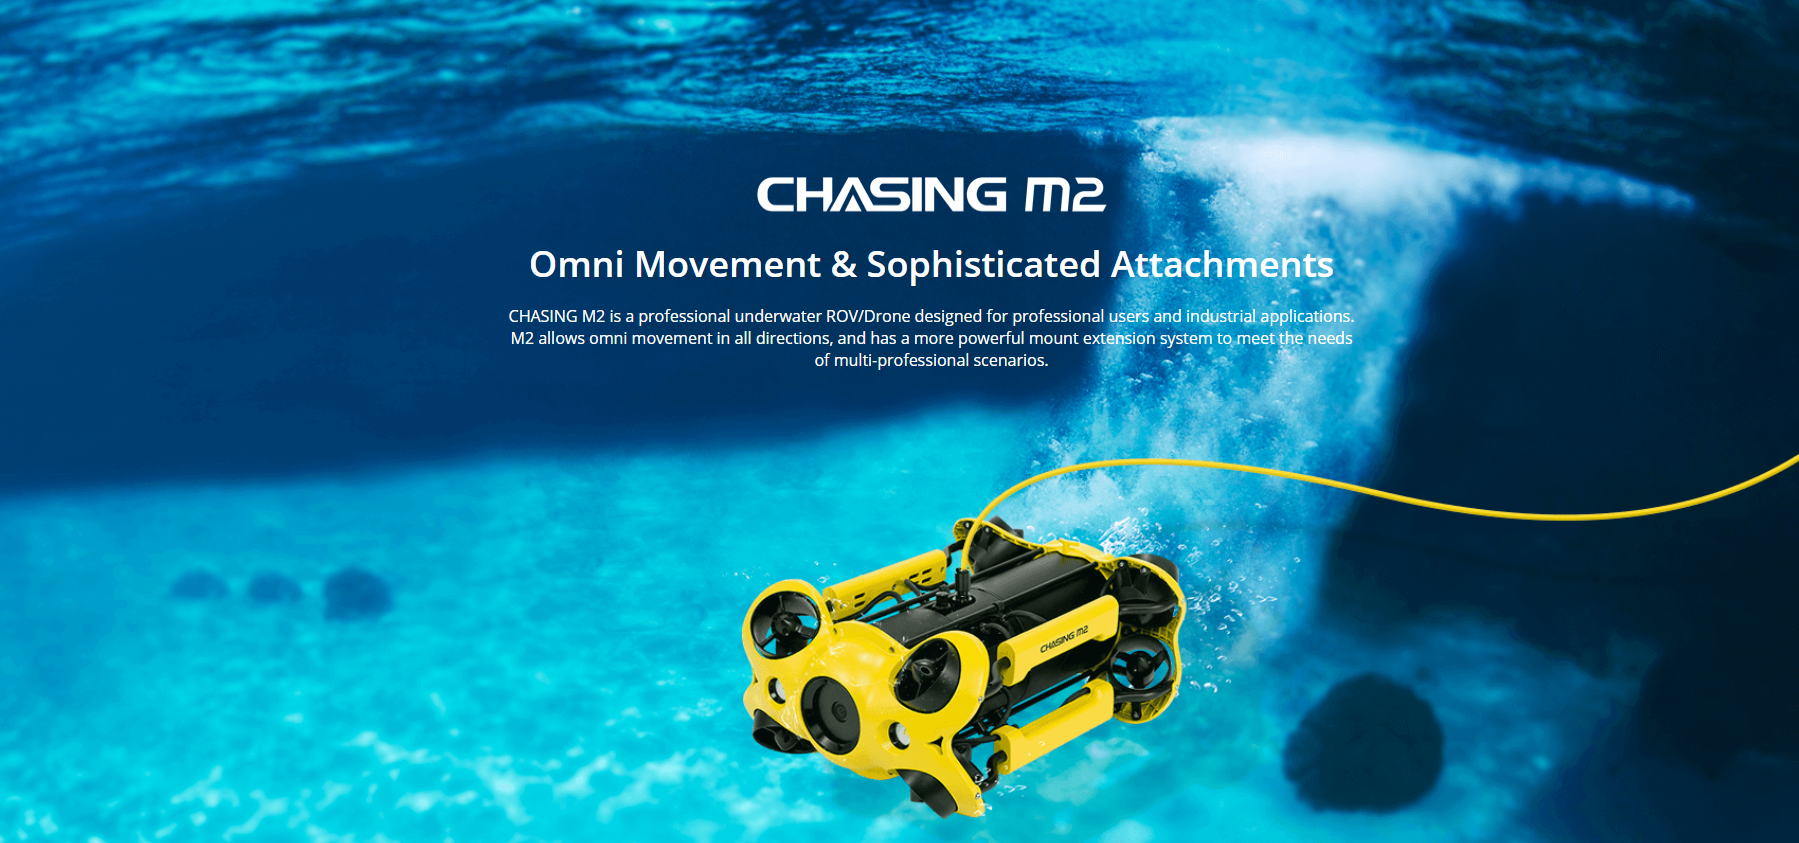
Today we're taking a look at the Chasing M2 from Chasing Innovations, which retails at around $2700.
The Underwater ROV Market
Chasing Innovations has clearly done their market research and knows there is a growing demand for high-quality underwater drones, more specifically referred to as Remotely Operated Underwater Vehicles or ROV. It’s estimated that the global Underwater Drone market will hit $8.7 billion by the end of 2027 as the demand for these tools continues to grow.
With five underwater ROVs on offer, including the M2 I’ll be reviewing, Chasing is one of the largest manufacturers in this category. From my research, I was surprised to find a number of other companies offering high-end consumer and professional ROVs which are primarily designed for underwater surveyors, inspectors, hobbyists, and professionals looking to capture underwater photography and videos.
The Chasing M2 seems to offer enough advanced features and controls that certainly make it feel premium and capable, but at the same time still very accessible and easy to learn how to use even if you’re new to the underwater ROV experience. While this is my first ROV, my background with flying drones professionally will help me explain the similarities, differences, and overall experience with the Chasing M2. From my past few weeks using this drone, I found a few important details and considerations that you should know about before you decide to buy one.

A Very Detailed Review is Ahead
I highly suggest following along with my video review and tests to get a more detailed understanding of how this ROV works and my experiences using it. Throughout this article, I go into a lot of details that might seem over-explained, however, with this likely being a very new product and experience for others as well, I want to best explain all the lesser-known or considered aspects surrounding operating, owning, and maintaining this drone.
Especially if you are considering the Chasing M2 as your first underwater ROV, you’ll want to make sure it's actually a good fit for your needs and environment. My biggest question, which I help address throughout this review is; does the Chasing M2 offer enough features, conveniences, and value to make it a good choice for you?
Let’s start by looking at the initial setup process and getting familiar with the ROV for your first test.
Getting Your Feet Wet… Literally
Size
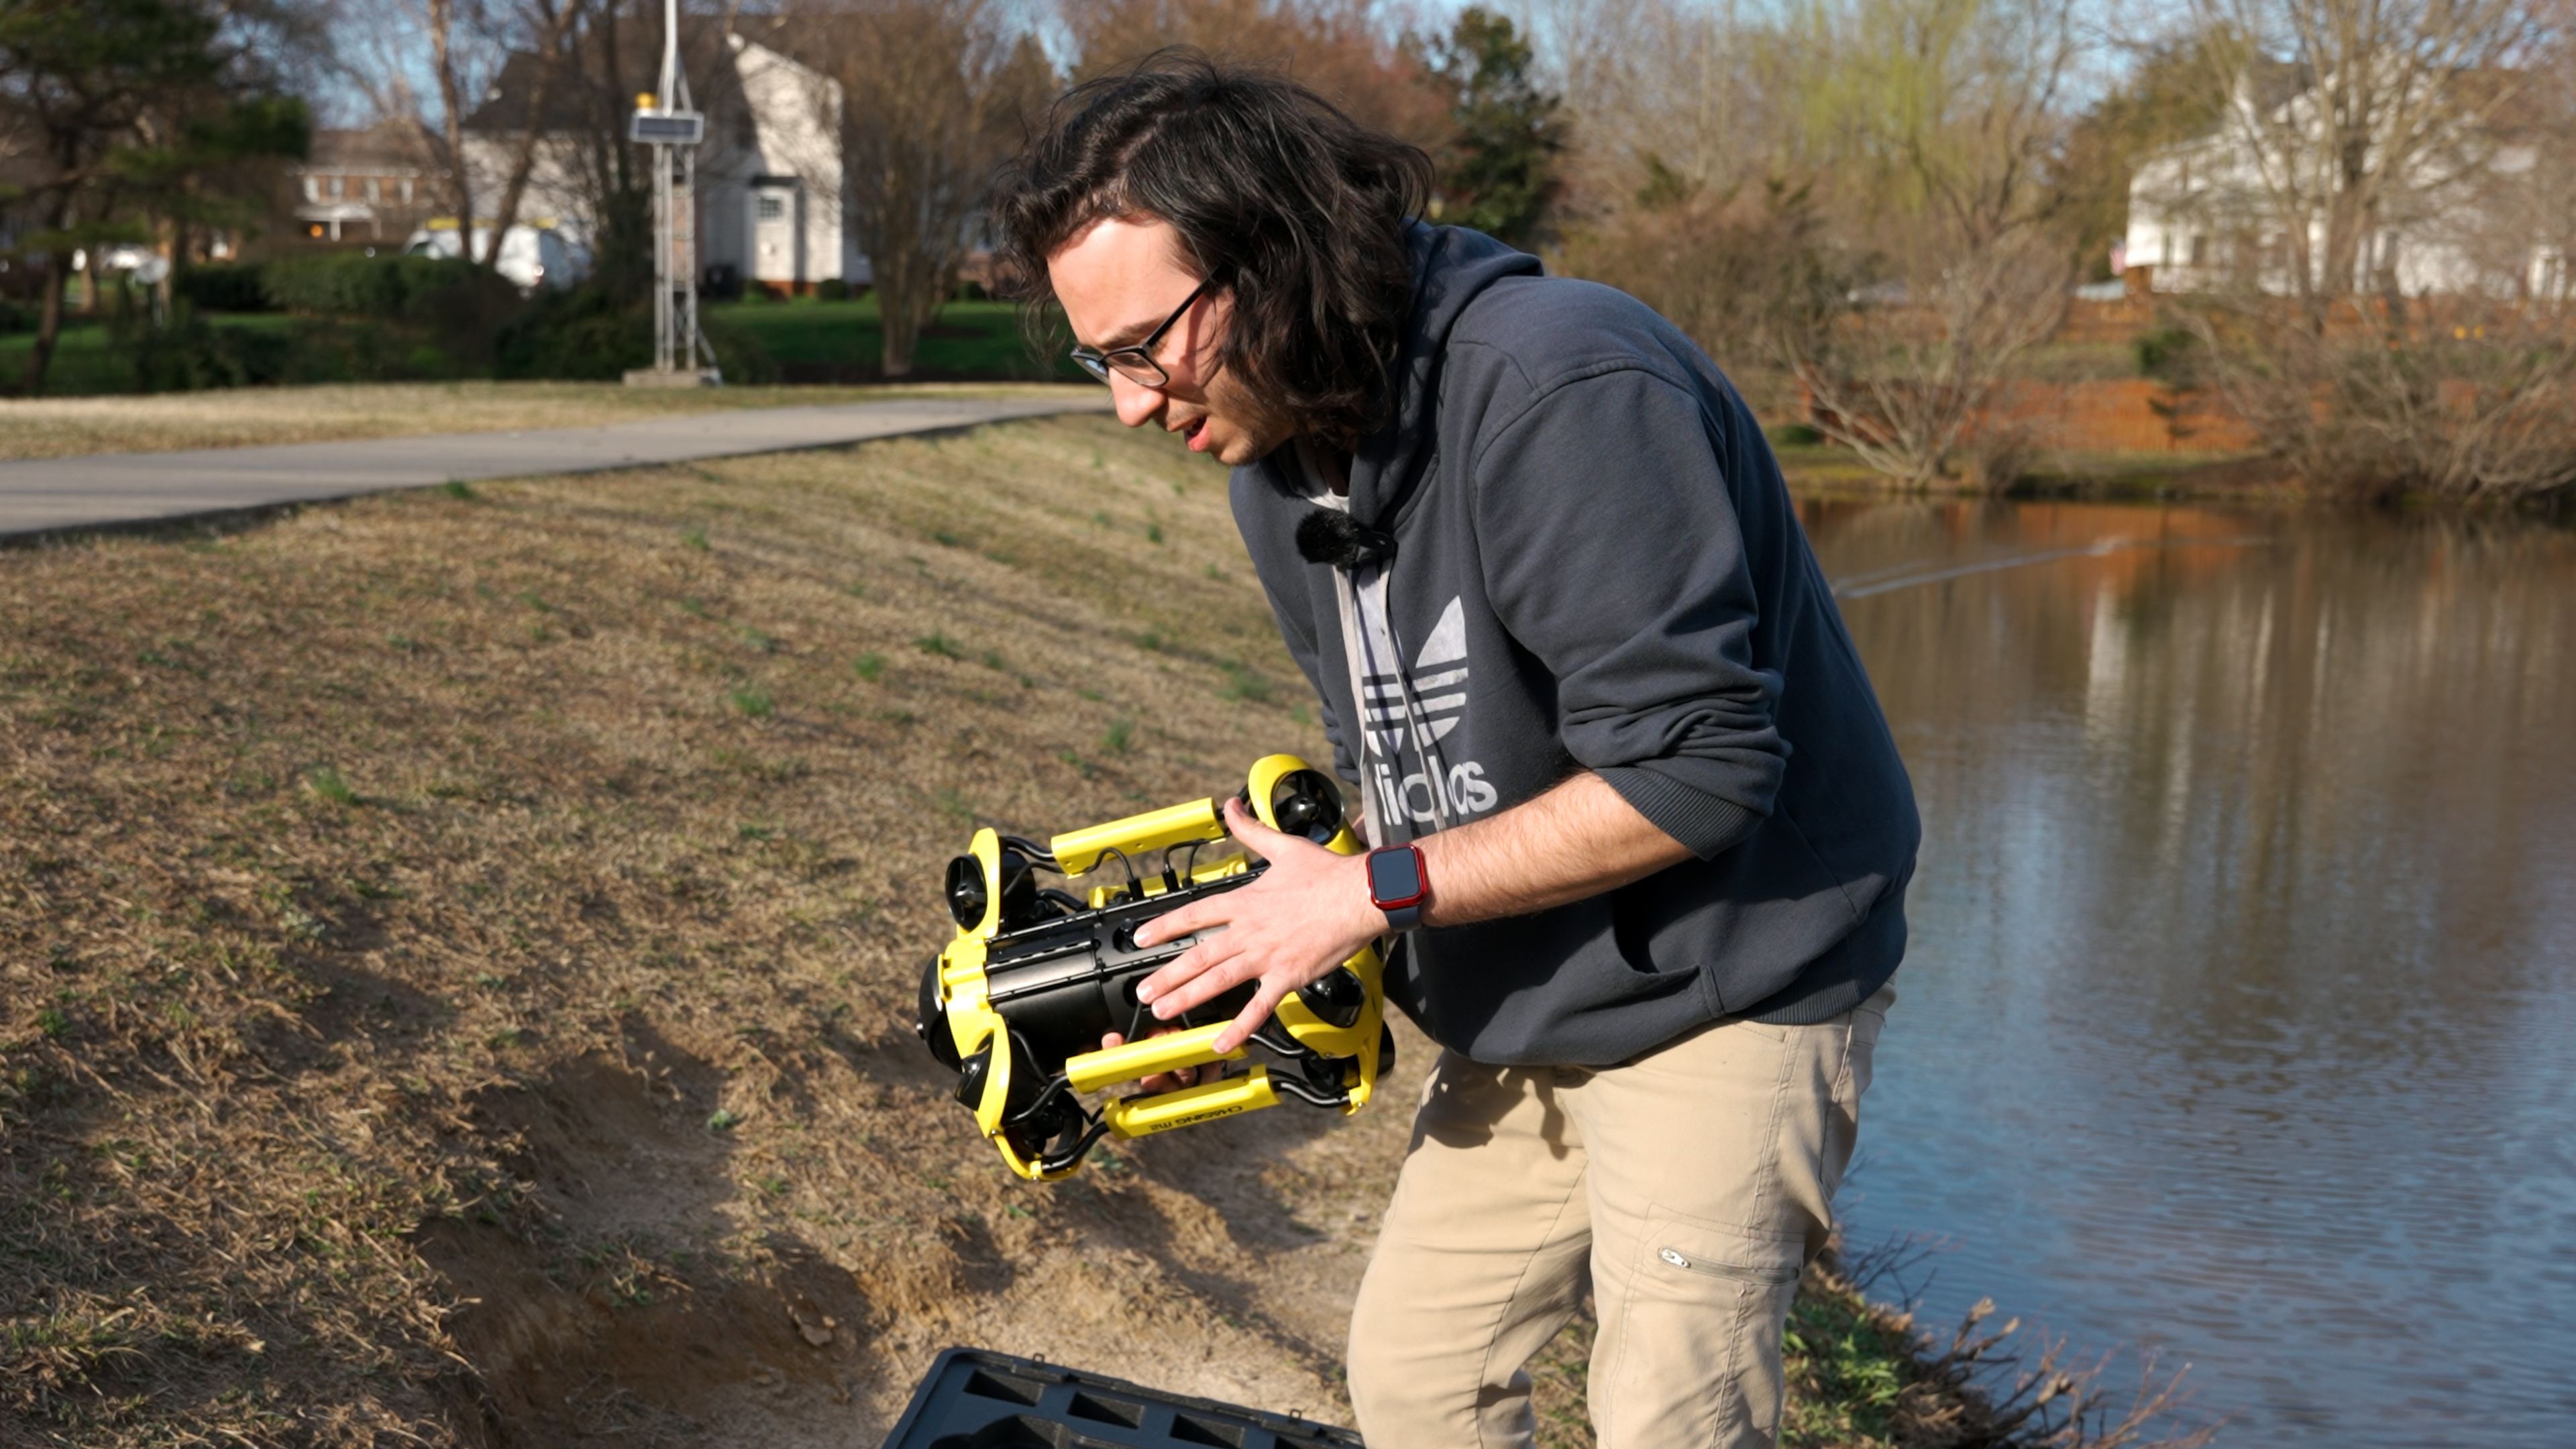
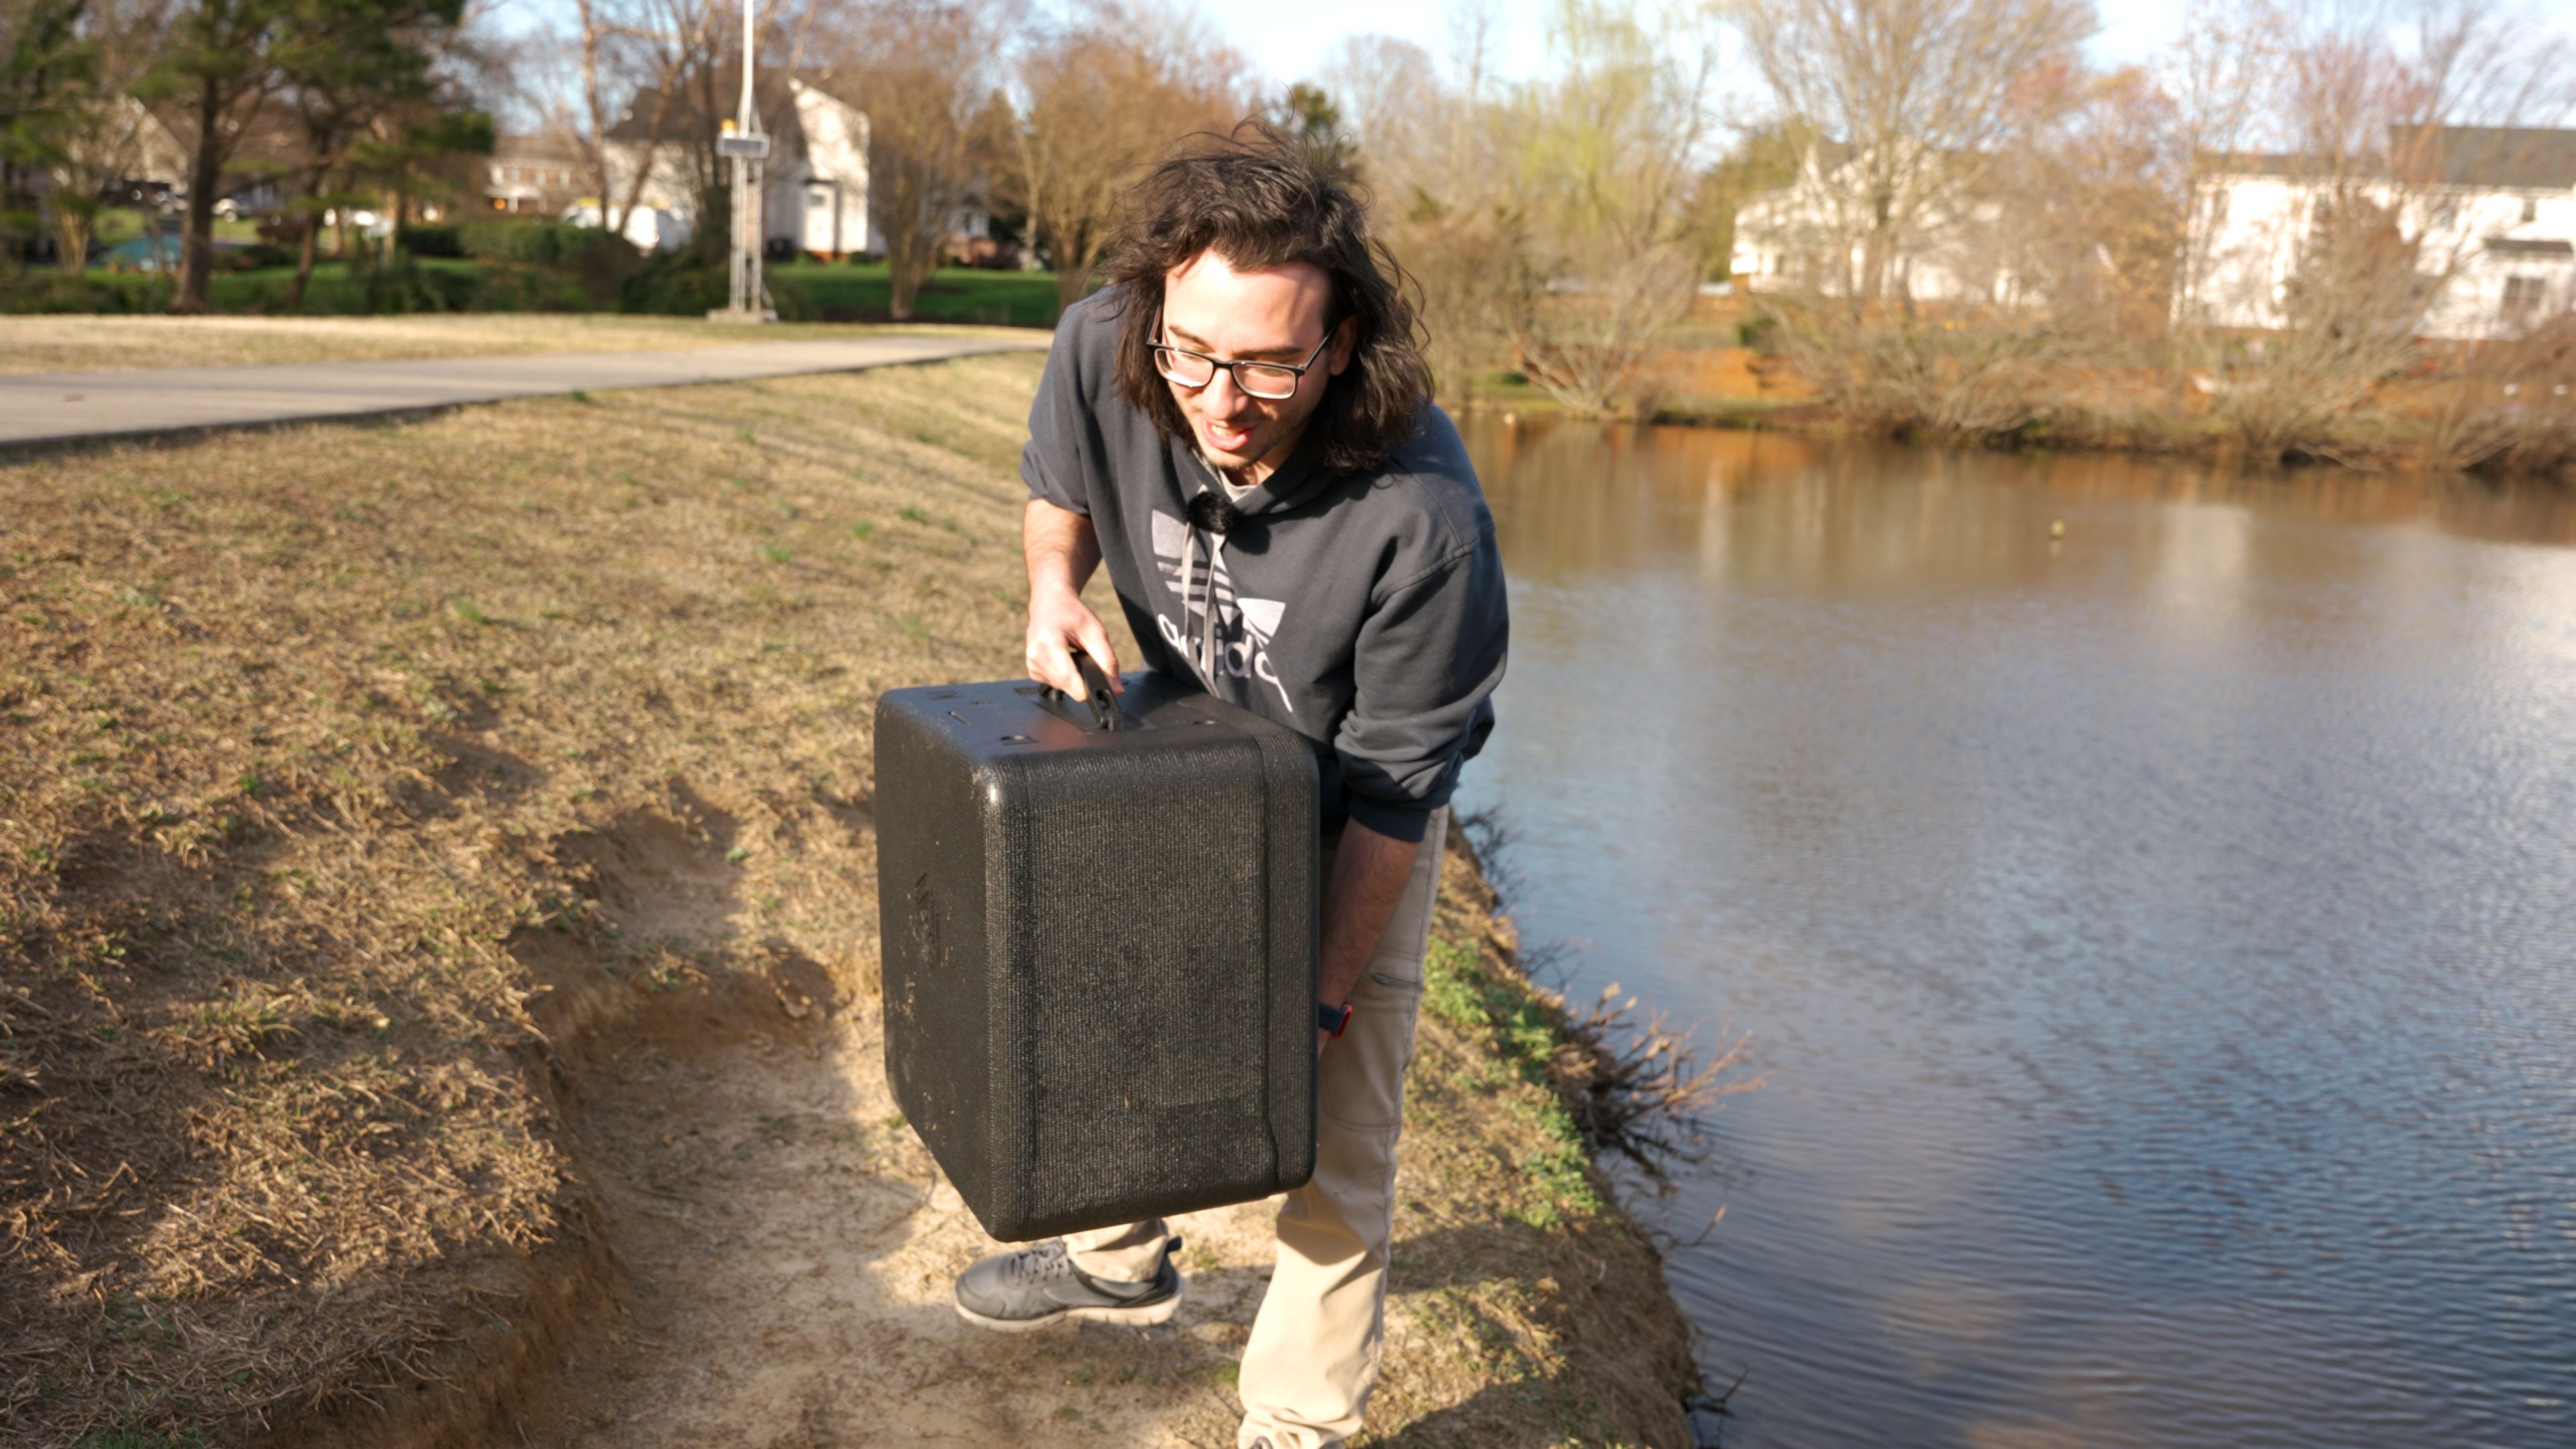
I was surprised to find that the Chasing M2 doesn’t need much to get it running and is actually very intuitive (even if you can’t be bothered to read the instructions in full). When you open the ROV shipping package, you’ll notice that everything arrives inside of its expanded polypropylene (EPP) carrying case. The case design and size reminds me of the older bulky DJI Phantom drones. While the ROV, with its aluminum alloy build, is about 10lbs (4.5kg), with everything packed up in the case, the total weight is closer to 20lbs (9.07kg). Combined with the fact that the case is huge, this certainly isn’t going to be something you can casually bring along your next trip without planning ahead.
Speaking of planning ahead, plan on getting wet and sandy…
Setup and Unboxing
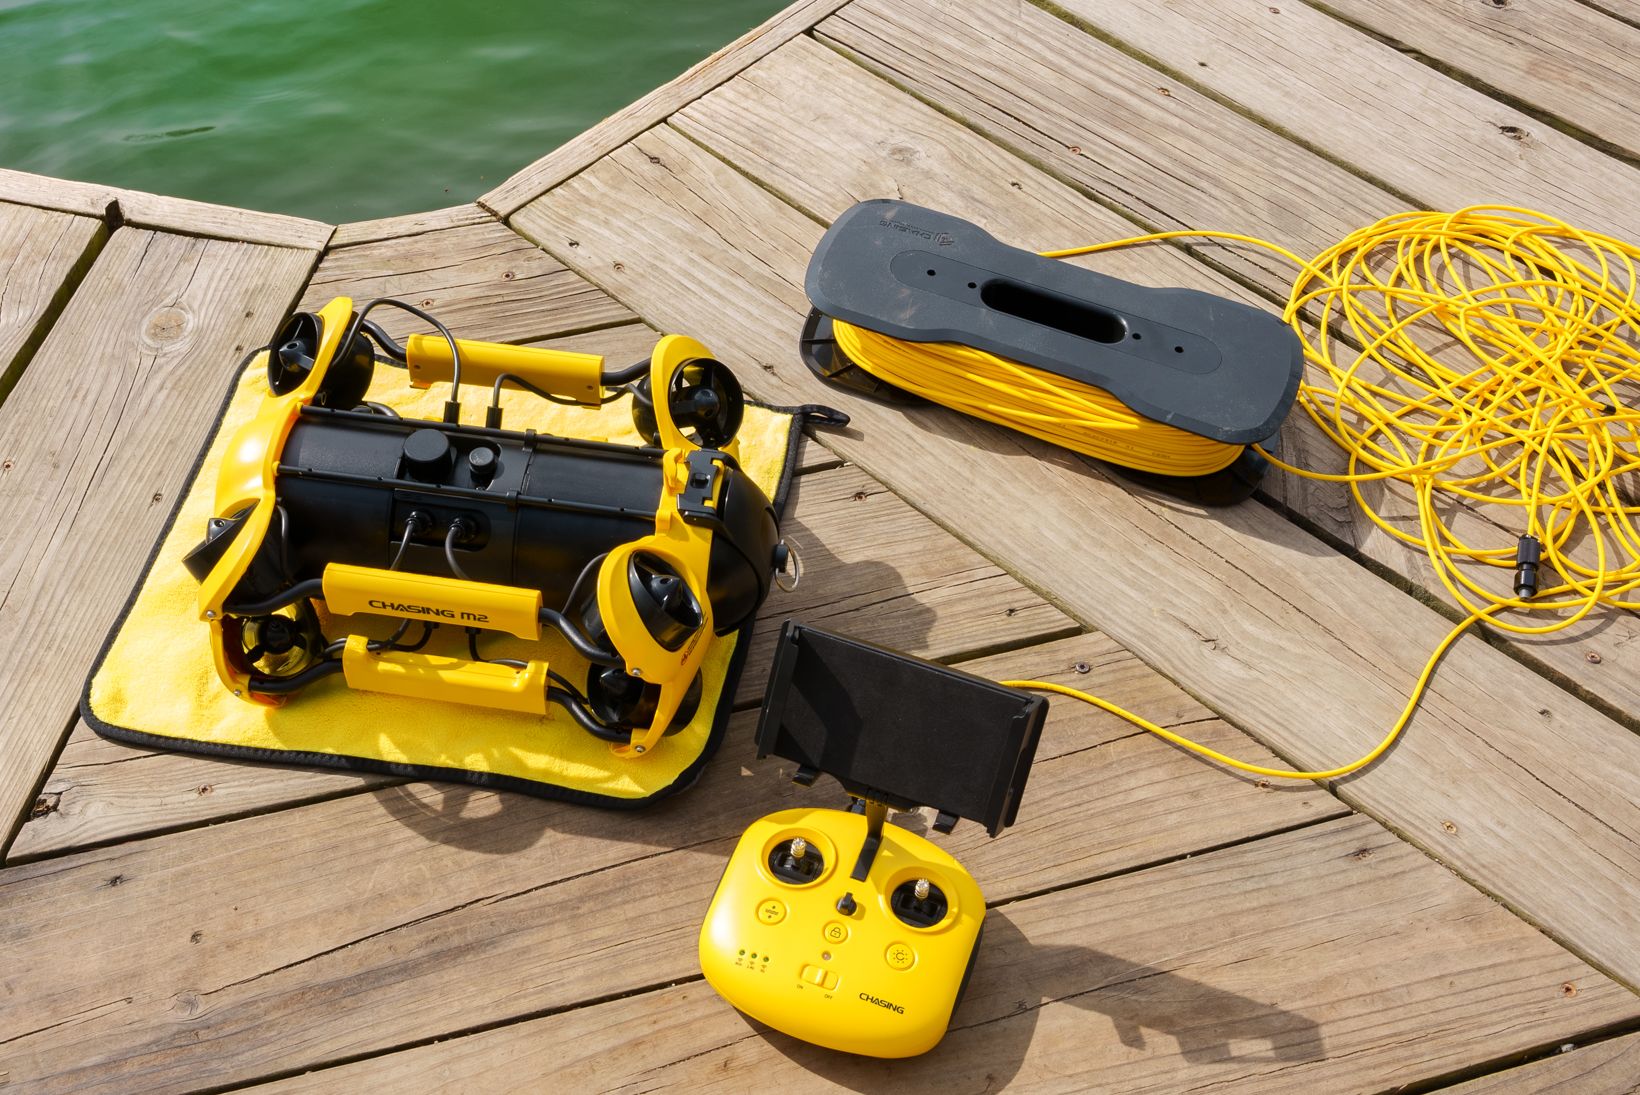
To get your ROV ready, the basic steps only include connecting one end of the tether cable to the controller and the other to the Chasing M2. Despite the setup itself being easy, there are a lot of precautions to keep in mind. I found it easiest to take out the three parts—the drone, tether, and controller—and lay them out flat before beginning the setup.
I'd also recommend setting out a larger towel or even tarp on the ground or area you'll be using to keep all your hardware protected from the elements during the setup and teardown process. You should also choose a relatively flat location which is a safe distance away from the water to prevent accidents.
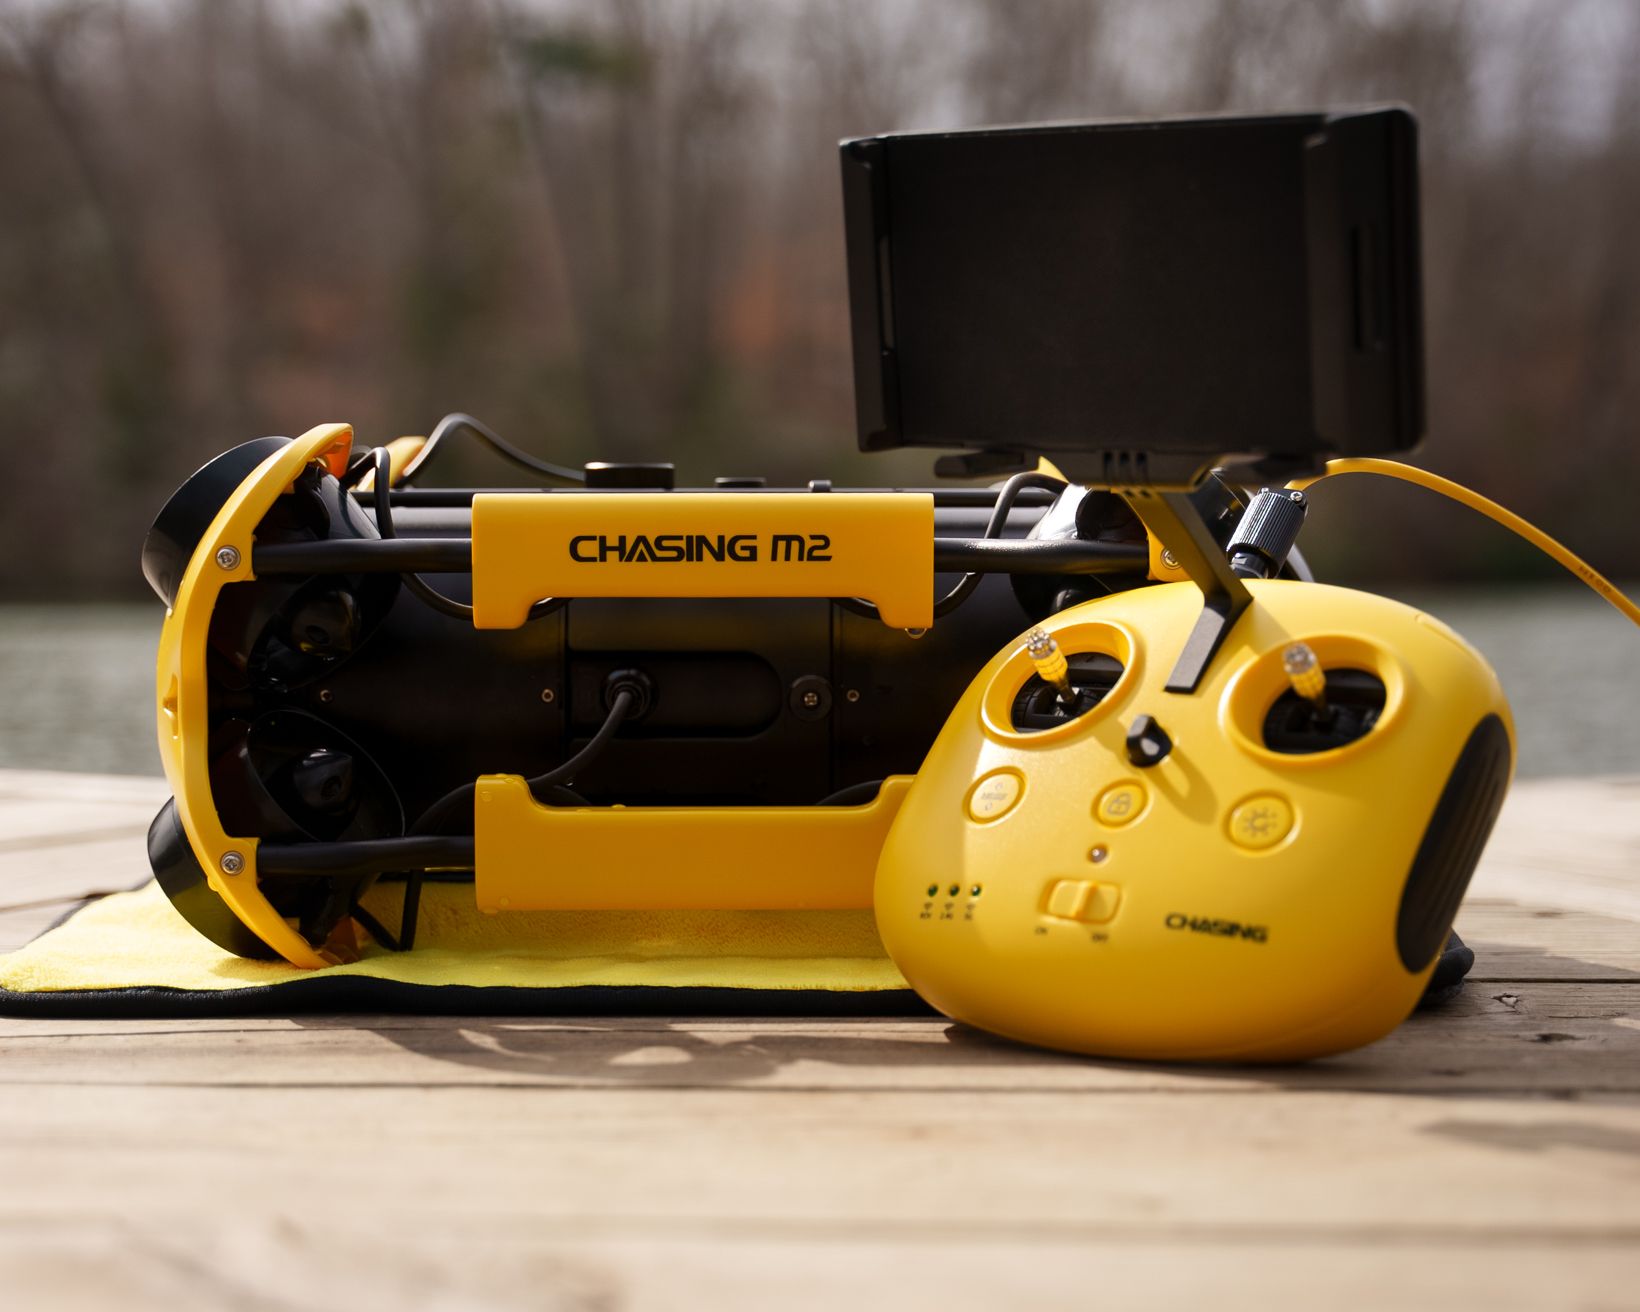
The carrying case is divided into two compartments, each opening from opposing sides of the box. The side with the Chasing name houses the ROV and a small absorbent towel. You'll benefit from packing additional towels for cleaning and drying with you as this single towel is not nearly enough.
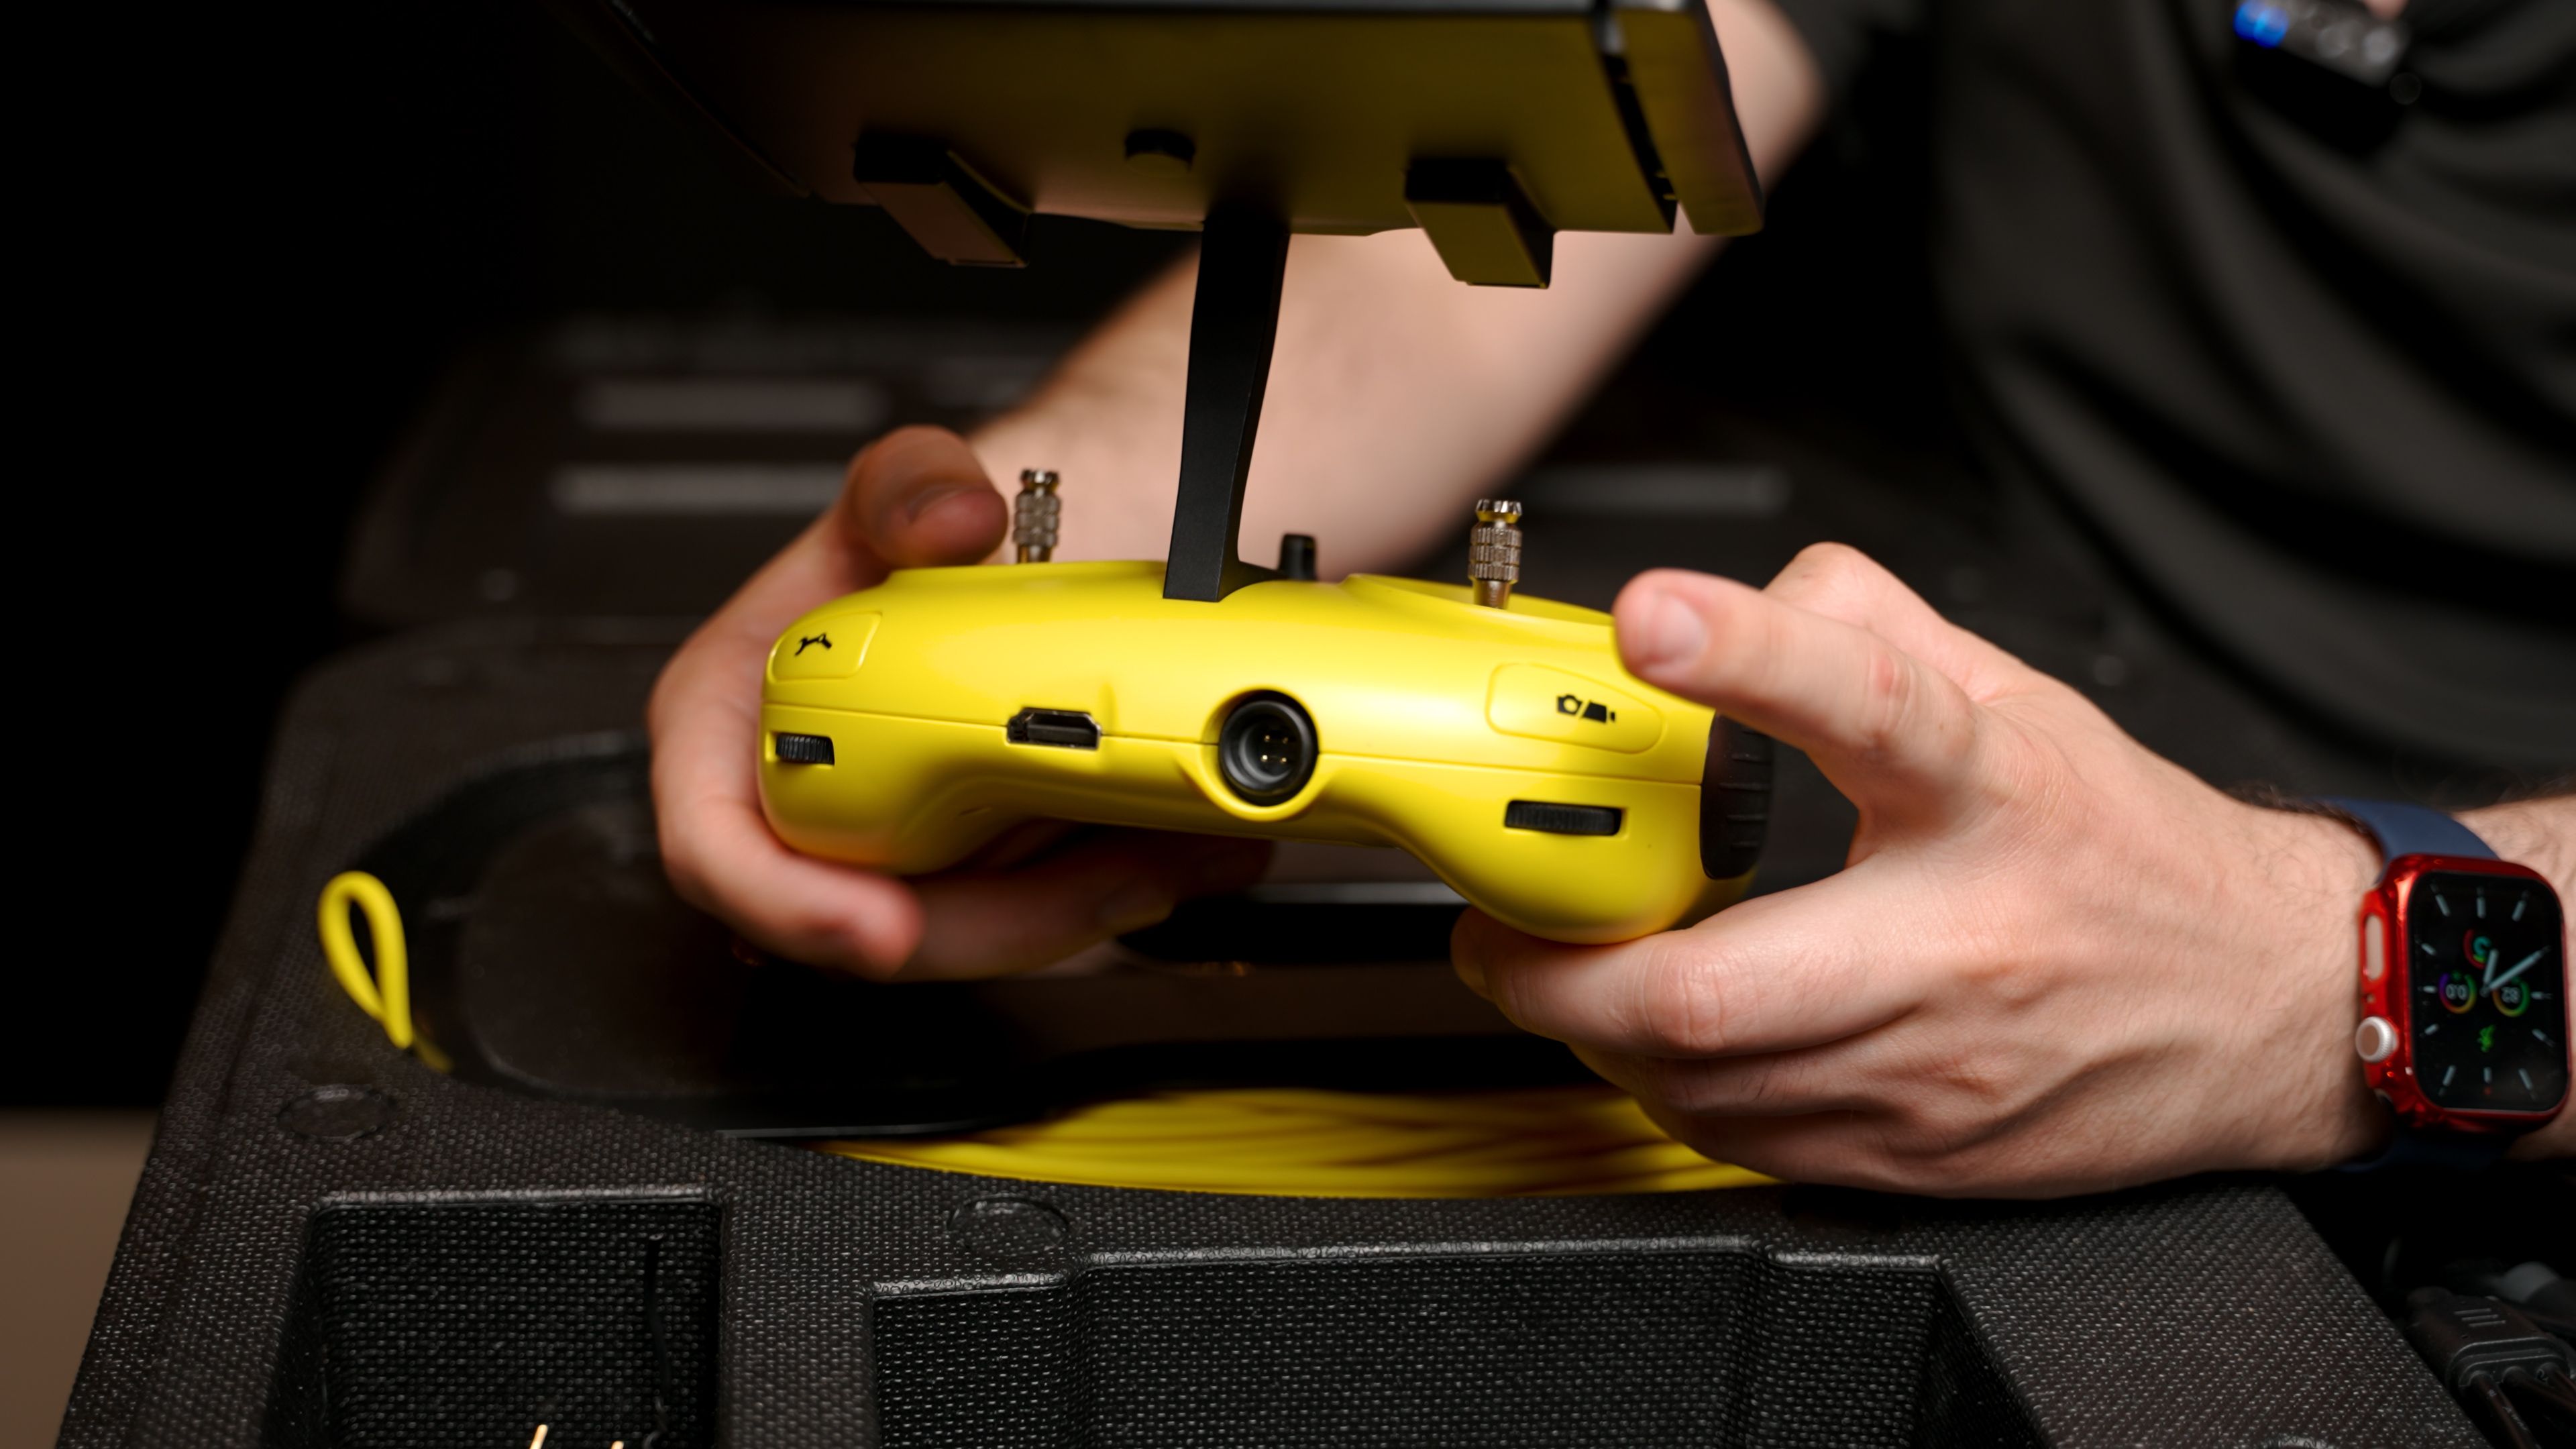
Flip it over and you'll find the controller, with a built-in phone holder. This side compartment also holds the tether, a sunshade for your controller, the AC adapter which can charge the ROV and controller simultaneously, as well as a small packet that includes your manuals and some replacement hardware parts.
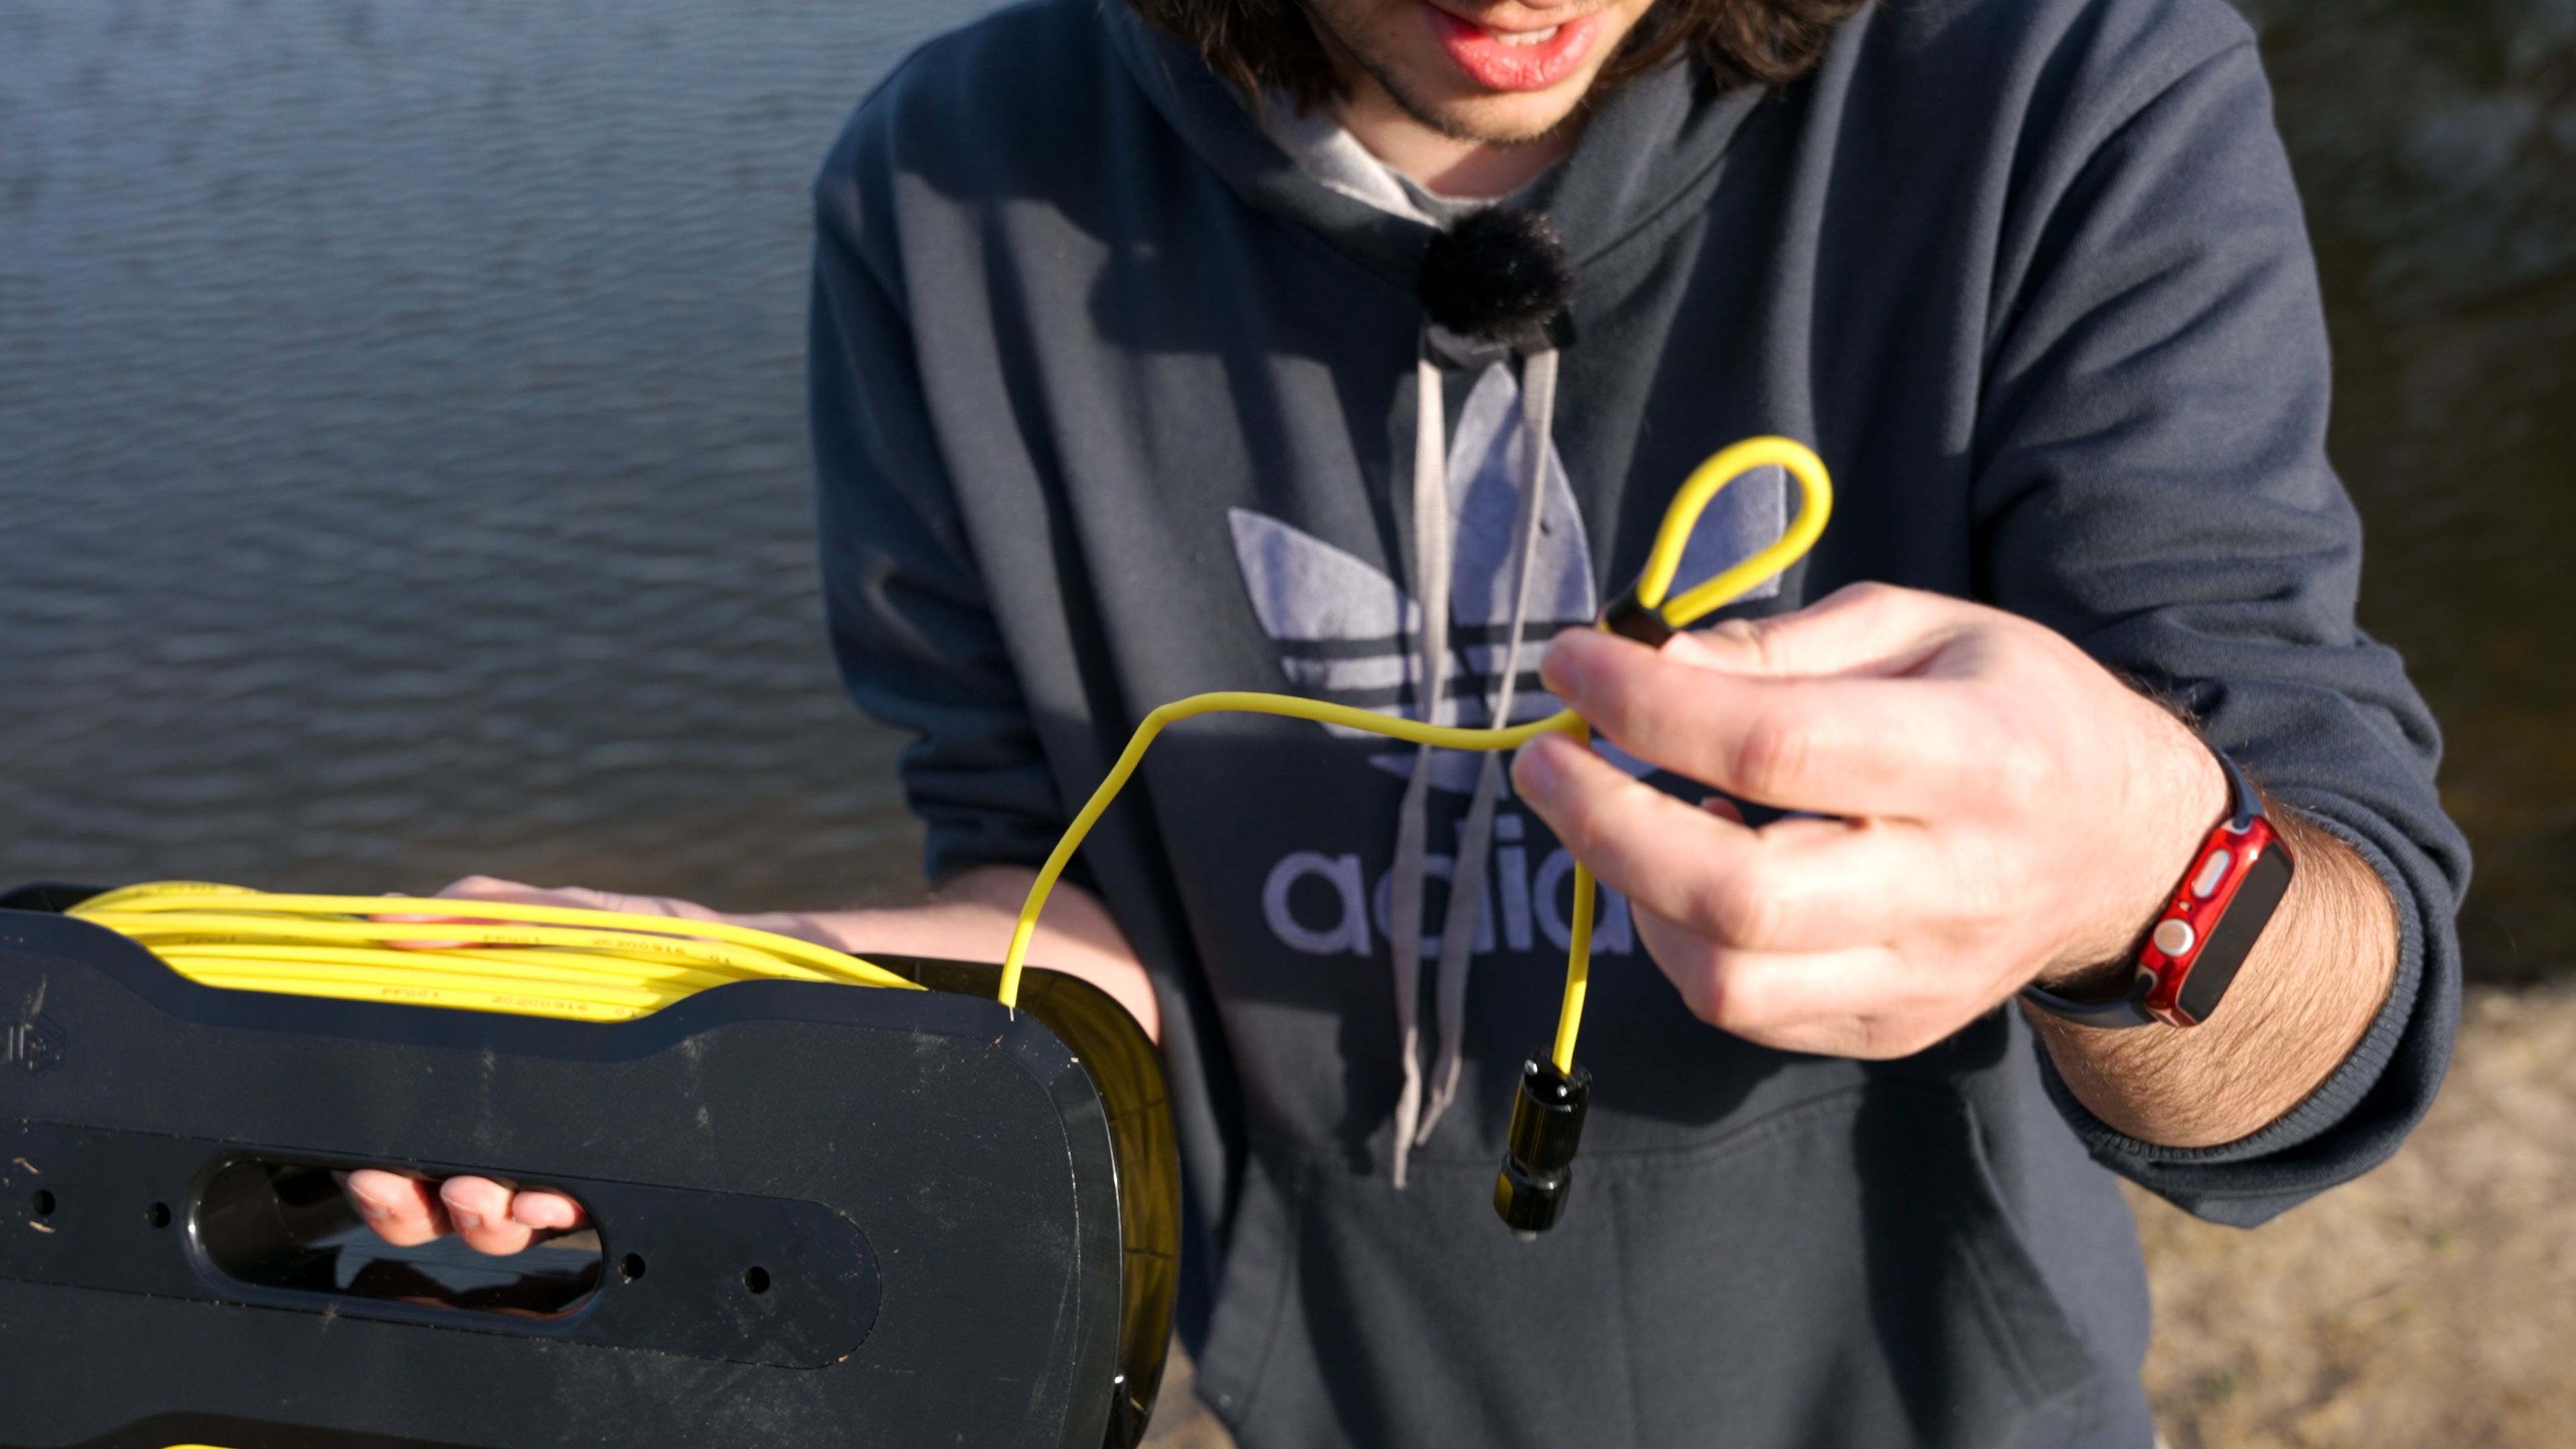
While both ends of the tether cable are identical, one of the ends has a loop/strap attached to hook on one end of the drone. Plug each dedicated end into the controller and ROV and turn their screws tightly for a secure fit. When not in use, the ROV's tether port is covered with a small rubber cap. Because it isn't physically attached to the drone, I could see myself and others easily losing this piece if they don't immediately place it into their pocket or a tight place in the carrying case.
Again, it's crucial that you make sure to tighten both ends properly to prevent water or other elements from seeping in. After a few tests in various lakes, I began to notice a steady build up of fine sand around the port covers of the ROV. Regular inspection and cleaning after every dive would be highly recommended to prevent any of this sediment from making its way into the port itself.
With everything connected, you're now ready to launch.
Your First Launch
Honestly, there was a lot of anxiety when setting up for my maiden voyage. I’ve flown aerial drones for over four years and currently use the DJI Mavic Pro 2, and so naturally, I was curious to see how much of that experience would translate over into using this new yellow submarine.
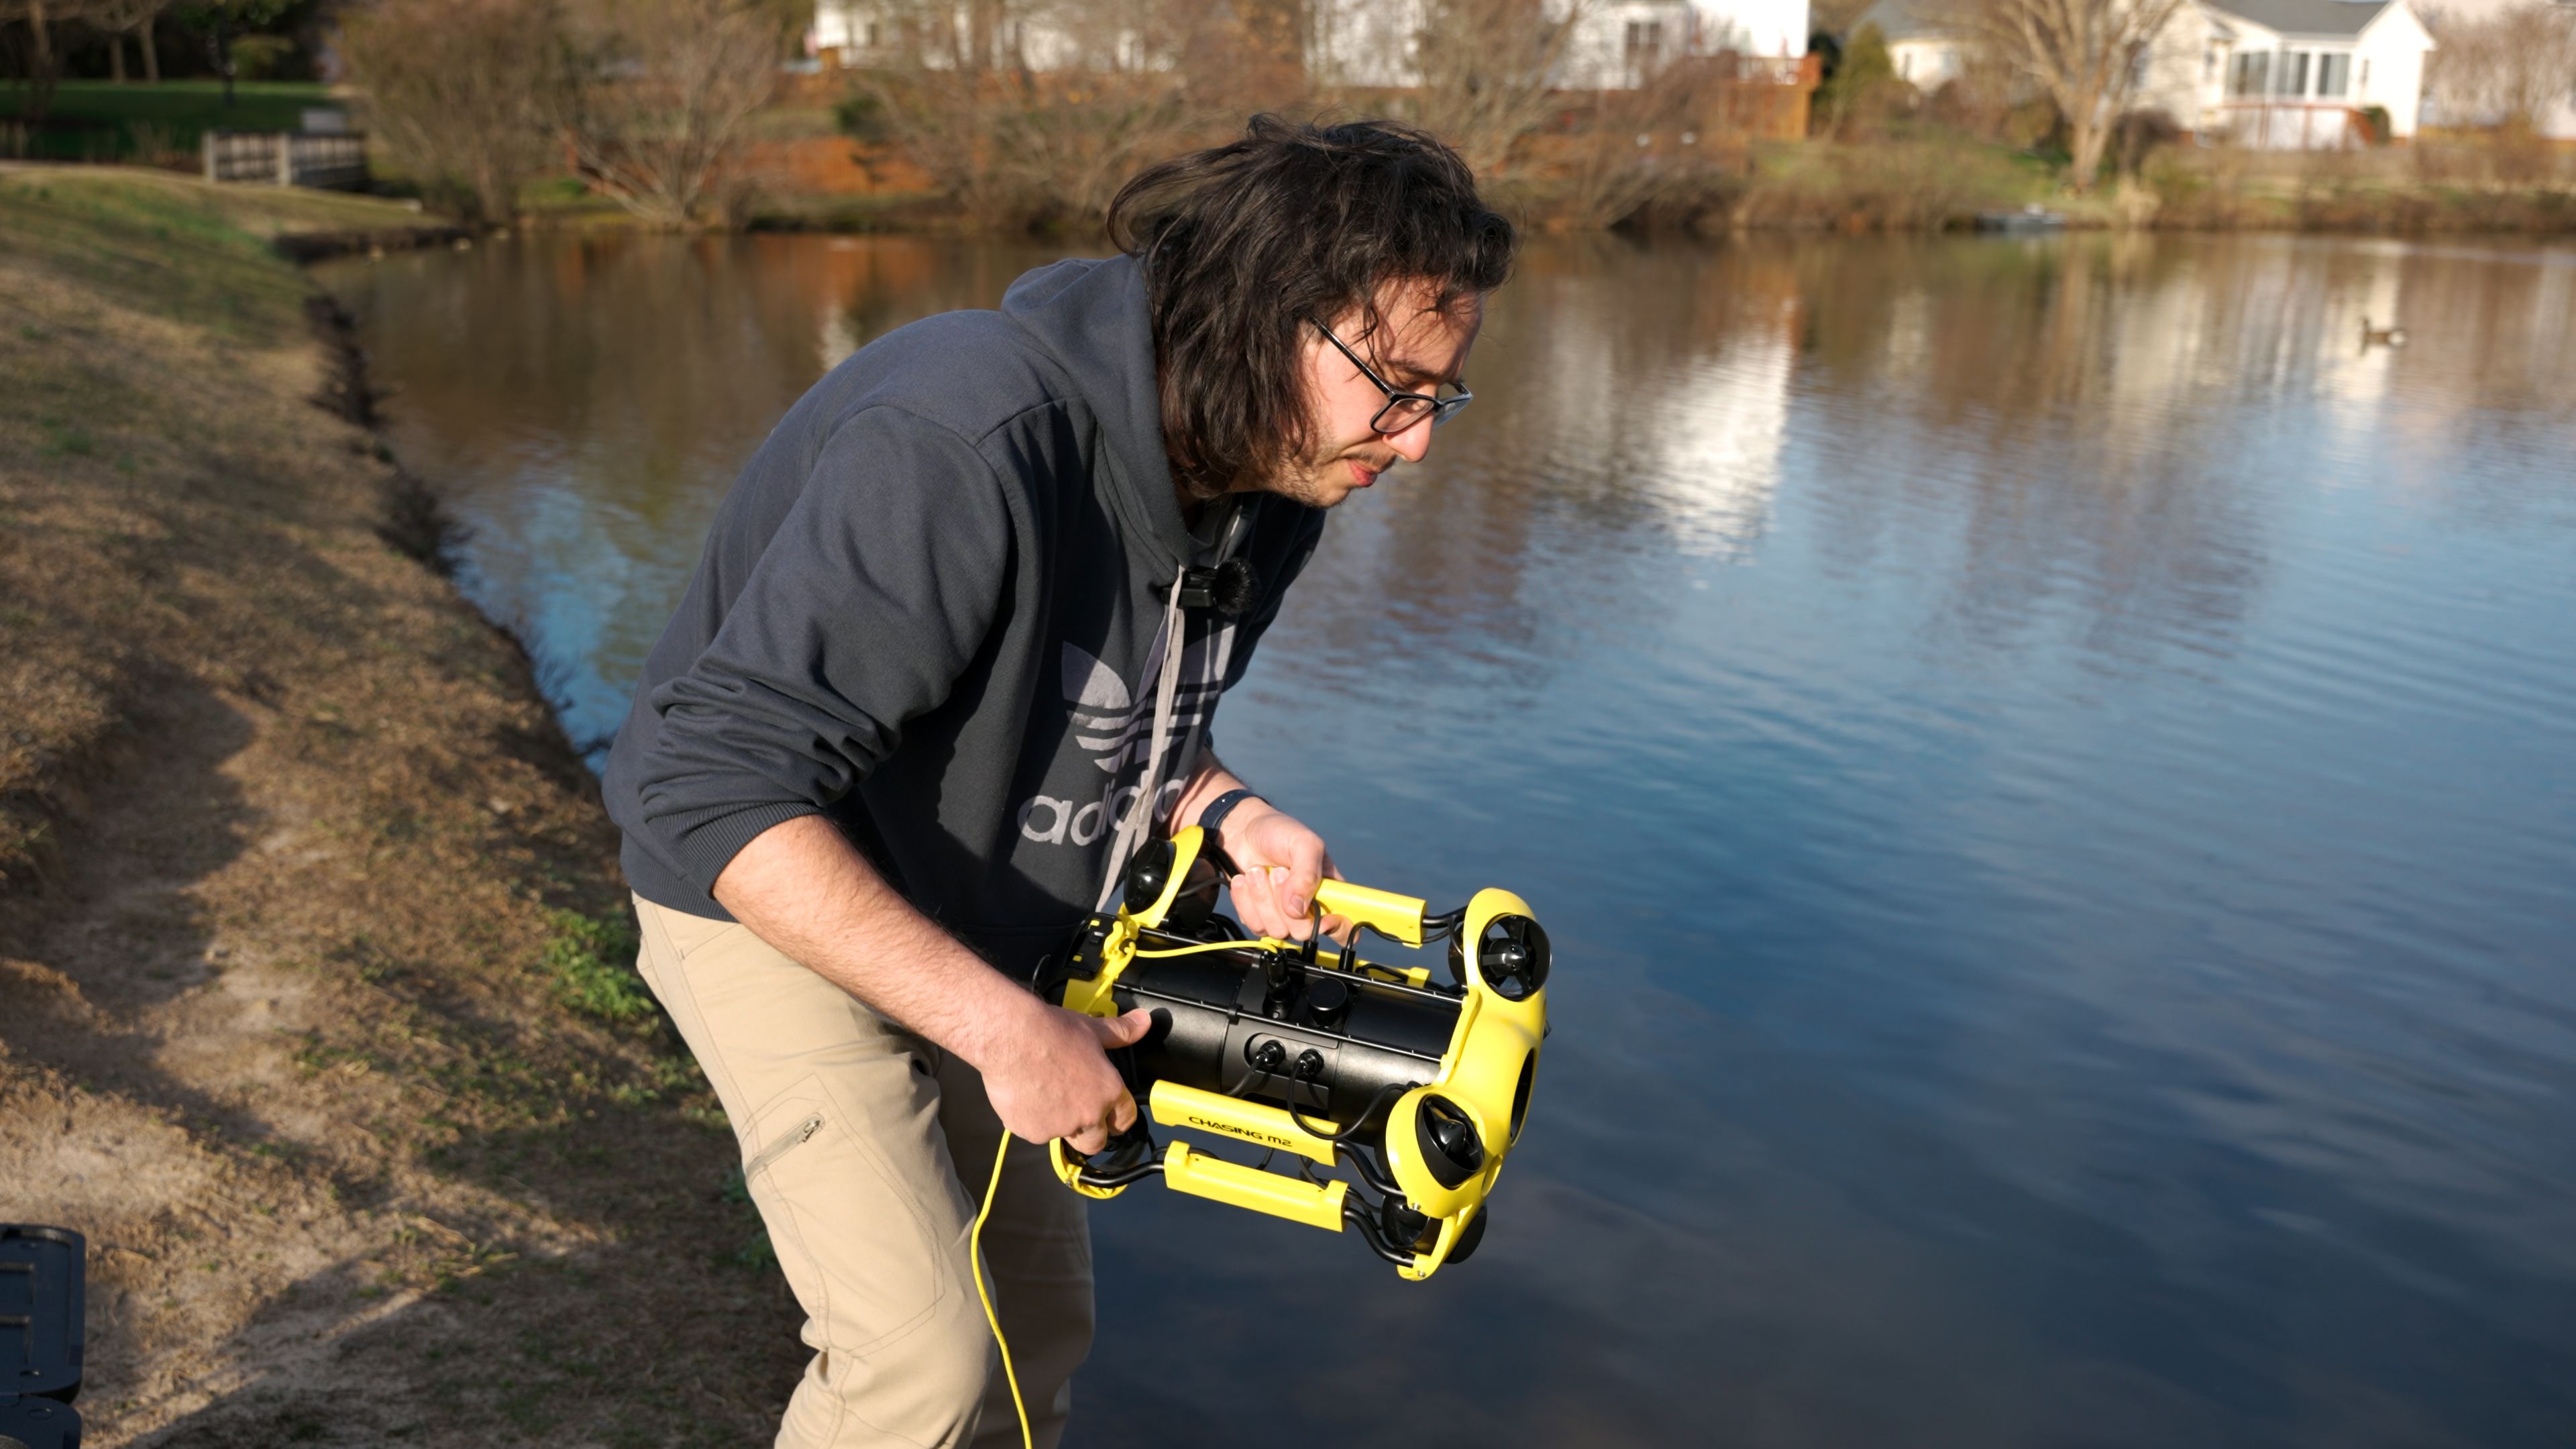
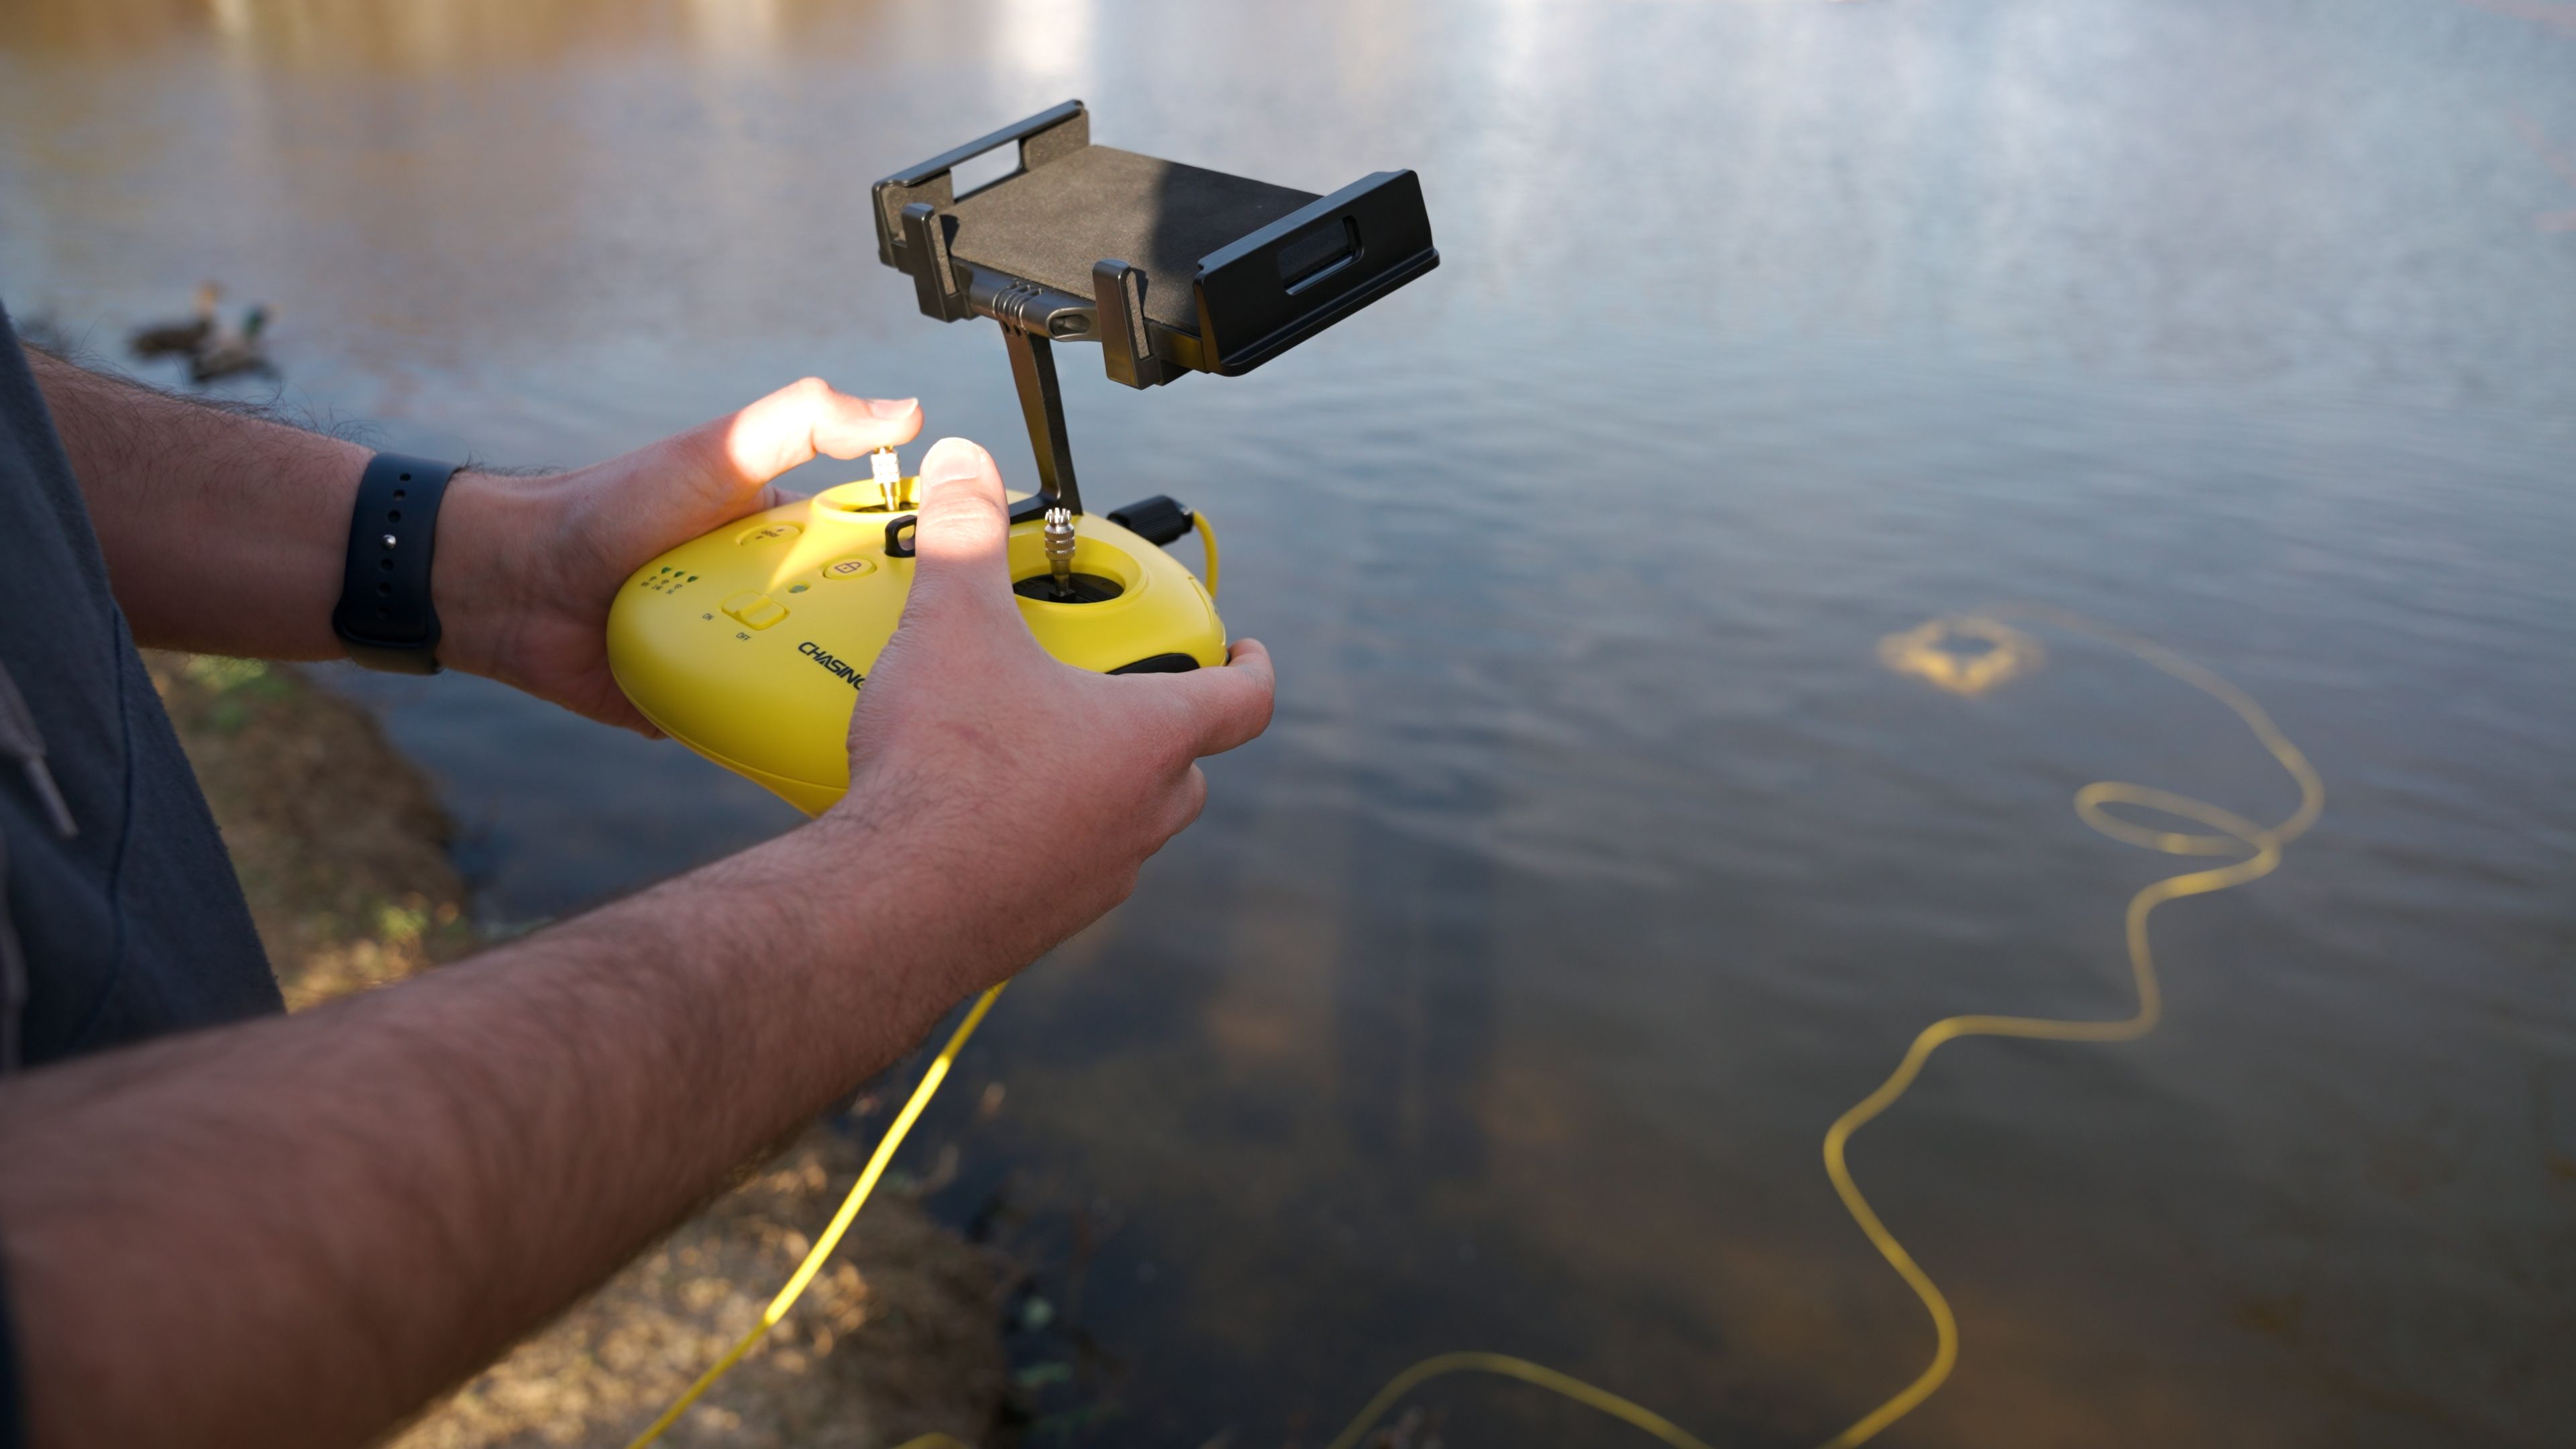
Unless you're launching into a pool or off a pier or boat, you'll quite literally have to toss this sub a few feet out into the water to get it going. Most coastlines are likely too shallow which is why you need to throw the drone further out. This is the most difficult part of the whole setup process, but only because of how worrisome it can be at first. You'll feel relieved, however, when you realize the sub does not immediately sink once you throw it in but instead has a natural buoyancy to it.
Once floating in a safe depth of water, you can move on to turning the Chasing M2 on.
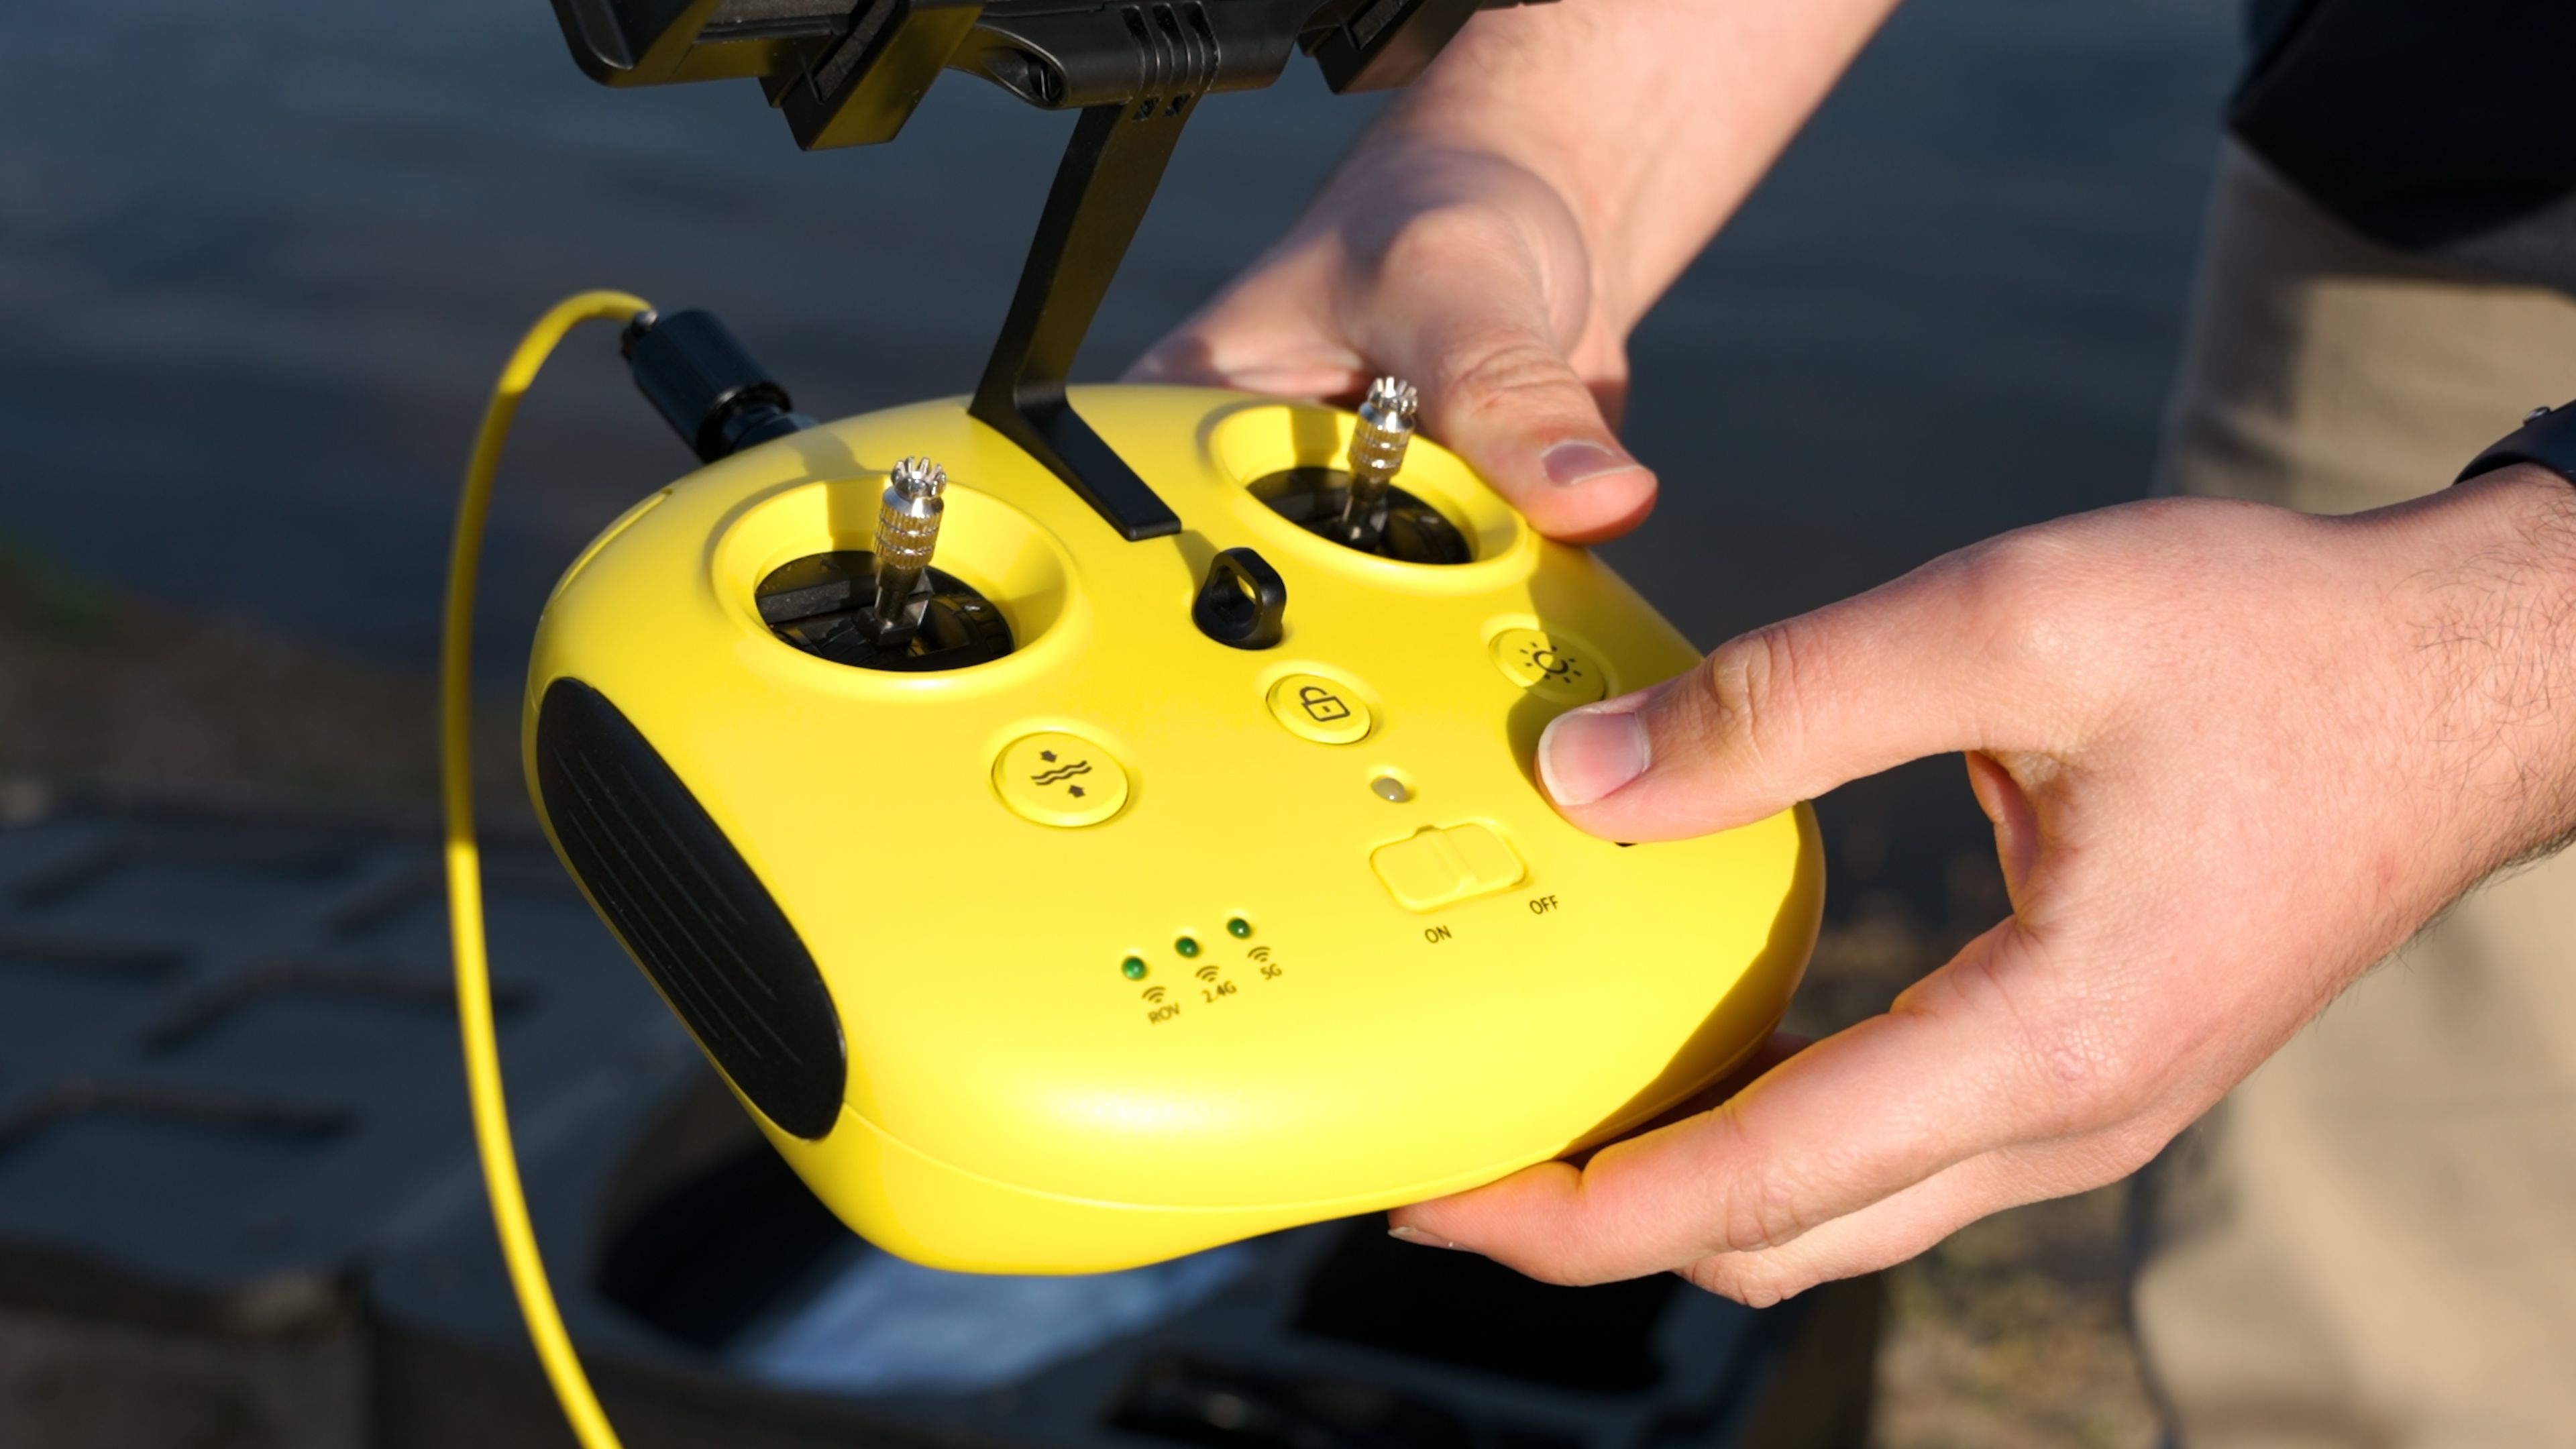
Controller
There are no buttons or indicators on the ROV itself. Turning it on is done via the controller itself. The on switch turns the controller and drone on and begins the wireless connection process as well for pairing to your smart device. After a few seconds, you're ready to unlock the drone's motors using the lock/unlock button at the center of the controller. Hold it for a few seconds and the motors engage. The Chasing M2 will drop into the water by a few inches so that all its motors can spin.
One button that's interesting, but that I didn't have the opportunity to test out, is the rear right one indicated by a gear. This allows you to use an optional arm attachment which was not included with this review unit.

By default, the ROV is set to hold its position, and so even without any input on your end, the motors will spin to help keep the drone in place. In calmer waters, this surprisingly did a good job. It is important to note that while the drone is waterproof, the controller is not. Do your best to keep this dry and away from water. If you're operating this drone alone, be sure to put your controller down in a safe and dry spot before attempting to toss or pull out the drone.
Aside from actually controlling the drone itself, the controller is relatively bare and somewhat of a letdown considering how advanced and robust the rest of the drone is. Especially when compared to the DJI Mavic's controller, a lot is left to be desired. In part, I’ve been spoiled by how small and compact DJI has designed its controller. In contrast, this is bulky and feels quite dated. But besides its physical size, the Chasing M2's controller also lacks with providing users important status indications.
Battery level is only shown with a single light; Green (High power) Blue (Medium power) Red (Low power. Aside from this and your wireless connection indicators, no additional info is provided. It's not until you connect the controller to your smartphone that you can see other important information including heading, depth, temperature, and speed.
On top of this, the phone attachment holder felt more of a last-minute addition than an actual design choice. It feels flimsy and rather cheap, unlike the rest of the controller which despite its lack of indicators, actually felt rugged and well built. I didn't feel too confident in the mounts' ability to hold my phone securely.
When I was first getting used to the controls, not having the additional indicators was less of a problem as I was maintaining line of sight to the drone relatively close to the surface.
Once you descend, though, you are definitely going to want to have your smartphone or tablet paired. The problem is, this isn't always practical or possible. There is a good chance that sometime in the future, the app either crashes or maybe even your phone dies while using it.
At the very least, as a backup, you should be able to some essential info like depth and distance from the controller itself on a built-in screen. This has been crucial with my time using the Mavic Pro 2 when the app or phone suddenly stopped working and I needed to rely on the controller to safely return it home.
Retrieval
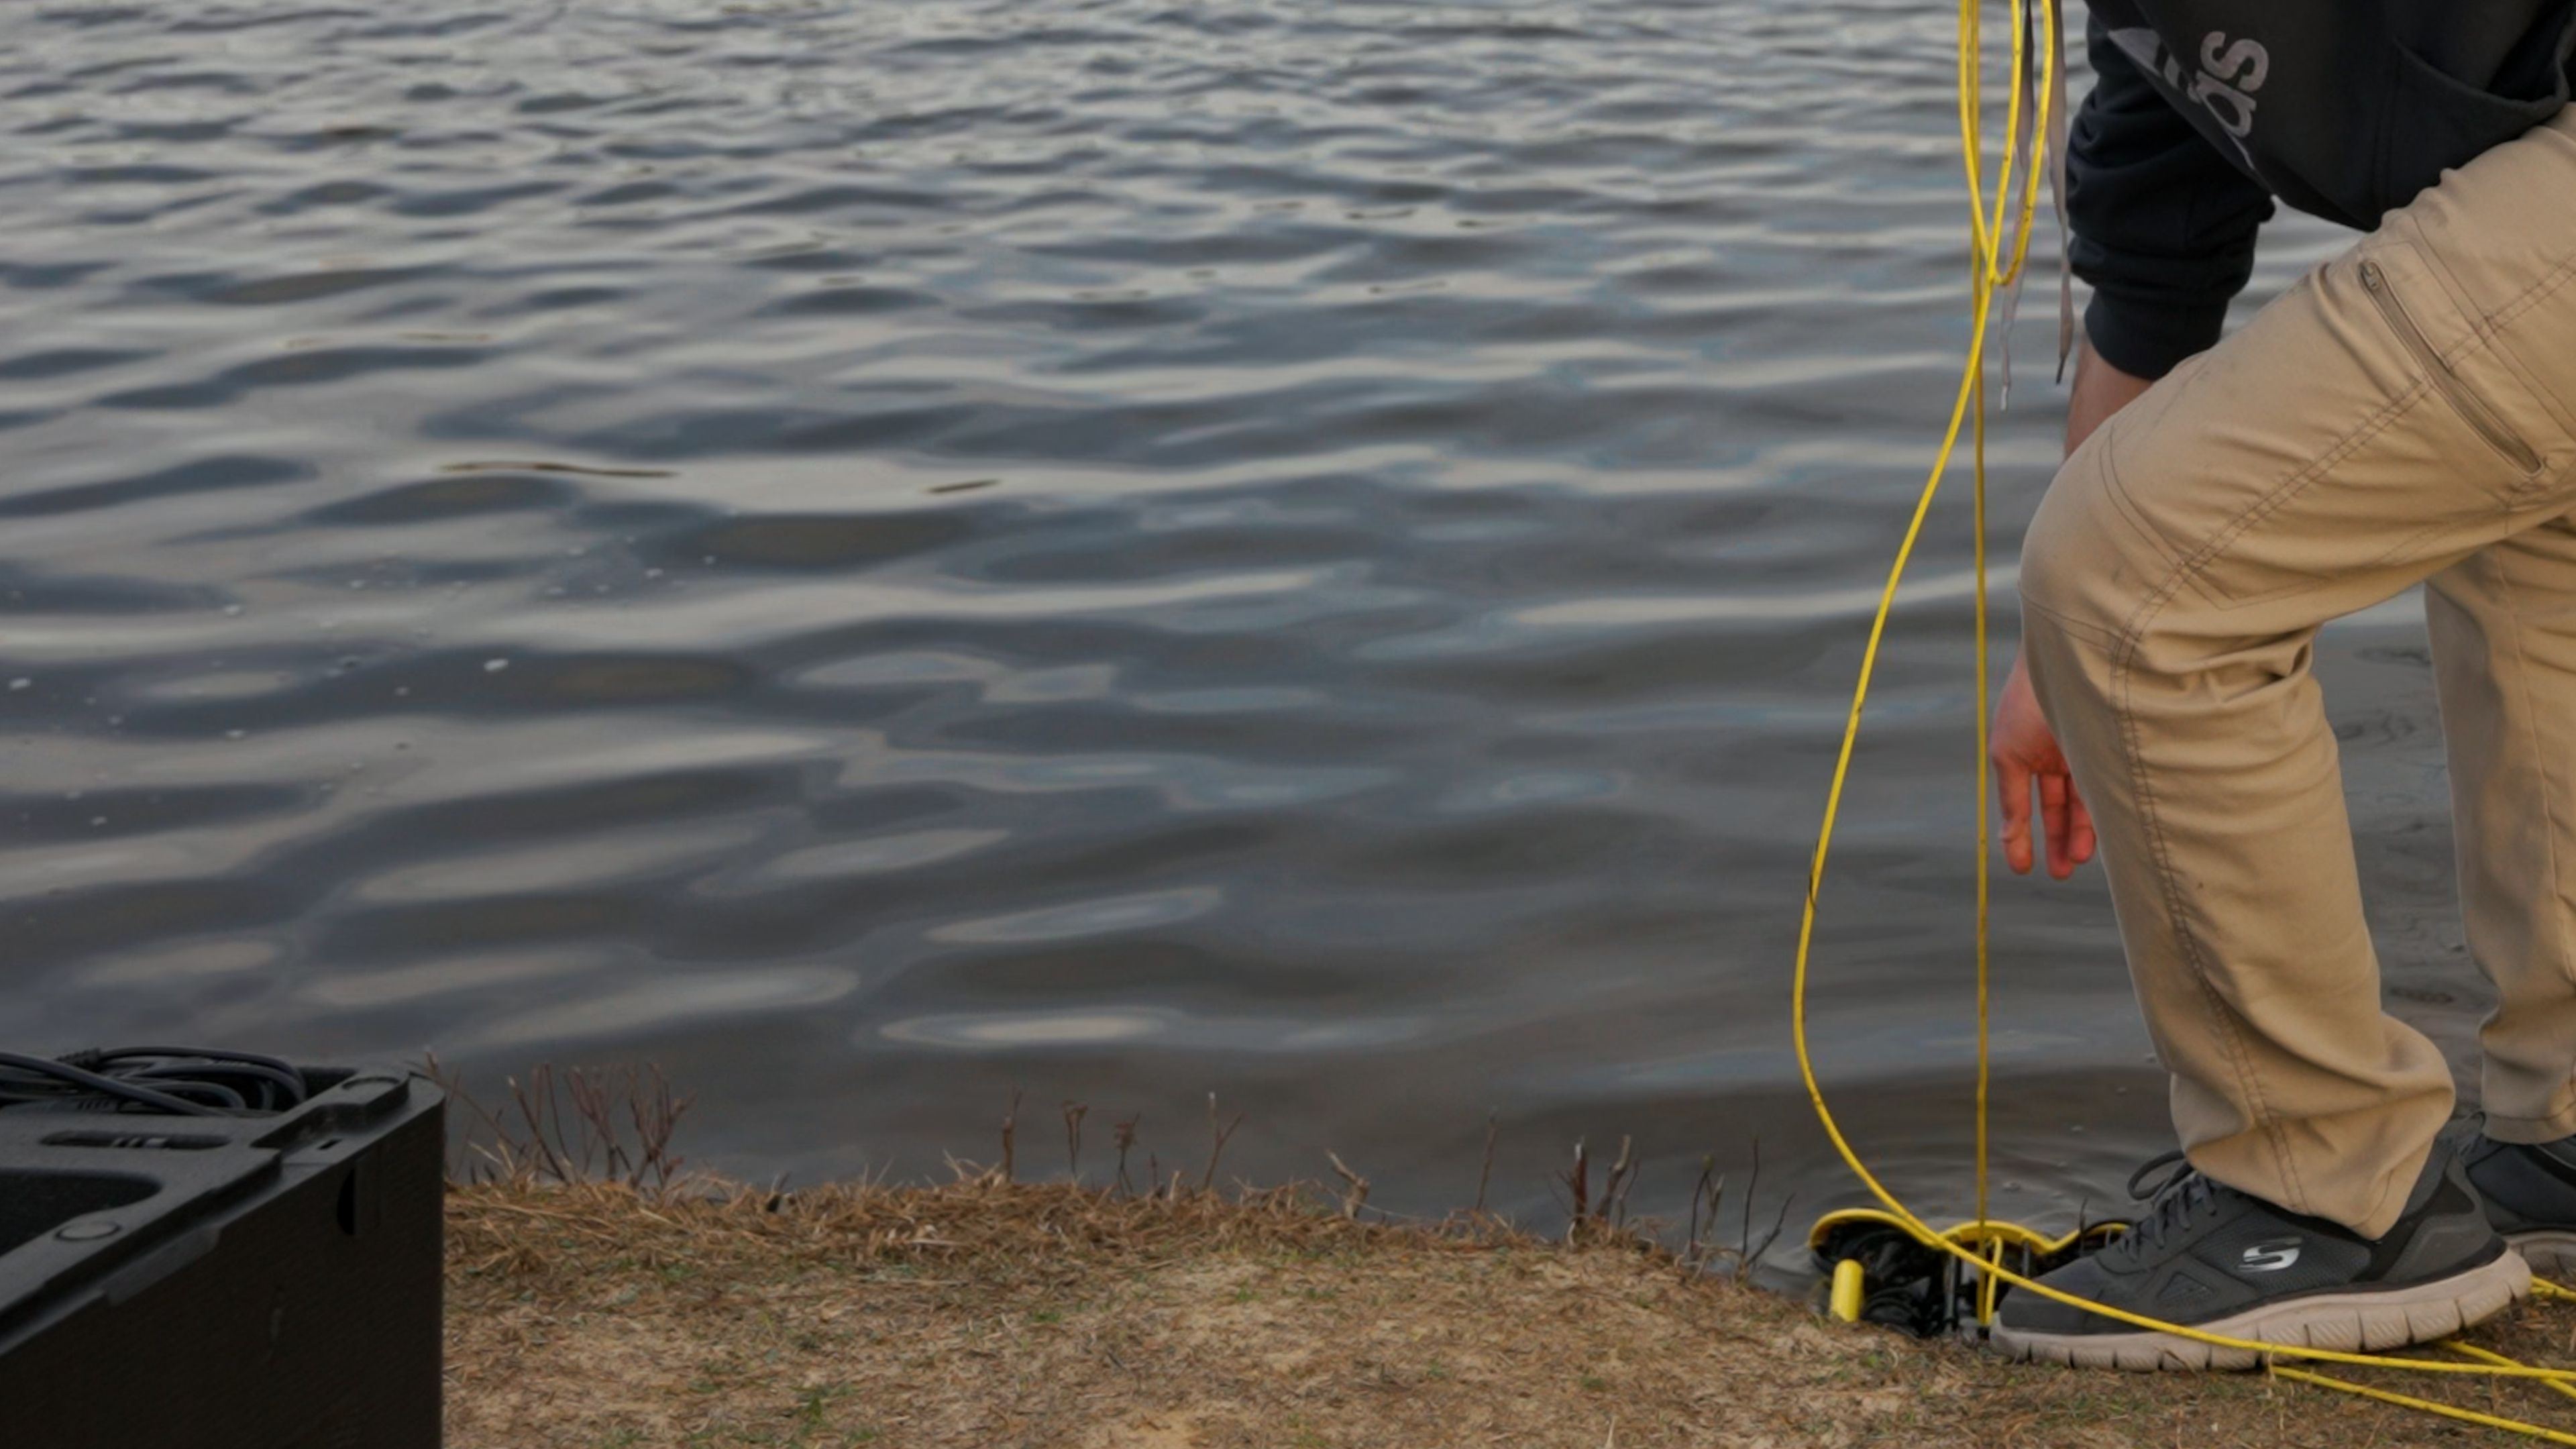
While Chasing claims that the setup only takes three minutes to complete, the teardown process is not quite as quick. Depending on where you’re trying to recover the drone from, this will dramatically impact how easy (or hard) it is to pull out of the water.
For the same reason you toss it outwards on launch, you’ll need to watch out for shallow coasts on its way back. One tip to circumvent this slight predicament is to navigate the drone close to shore and then to turn off the thrusters before it gets too shallow. I try to be careful to avoid dragging the drone along the shallower areas as much as possible. From here, I just gently pull on the tether cable to bring the drone close enough to where I can then lift the tether up to pull the drone out.
Of course, you’re going to want to be careful to not fall in the water when pulling out. Similarly, I frequently found myself actually walking a few steps into the water just to help ensure I wasn’t dragging the drone too much along the bottom.
These somewhat minor points are just things you need to figure out as you use the drone. Chasing’s official documentation doesn't really address them.
Now that you’ve got the drone in hand, you’re now going to need to pack it and the tether up. Sounds simple enough, right? Sort of…
Teardown/Pack up and Time…
You’ve now got lots of wet and probably sandy gear to deal with now. For the tethering cable that doesn't matter so much: it can either dry or be wiped down pretty quickly. You can easily put that back in the box without much worry, although I’m somewhat concerned by the loose sand it brings into the rest of the box that’s stuck on it.
What takes the most time is the drone being wet and usually having some loose sand, seaweed, small twigs, and other small debris. Unlike an aerial drone, it's not as simple as finishing your journey and packing it up. The Chasing M2 is rather hard to get completely dry. It's got several nooks and crannies that water and debris likes to hide in. Unless you have a few hours of spare time or a hairdryer on hand, you’re probably going to be packing up a drone that’s at least somewhat wet.
And while I’m not necessarily worried about the drone being wet, since it is after all waterproof, I’m more concerned about the water and potential debris build up in the carrying case, which normally stays closed. Even if you try to wipe down the drone as best you can before packing it up, you’re going to still be bringing in a lot of sand.
I’ve been trying to get into the habit of giving the drone a wash in the tub once I get home, provided I actually remember. I end up with a tub full of sand and little seaweed but nothing too crazy. I then lay out a towel on the floor to let the drone fully air out. I take a small towel to wipe down and dry out the carrying box too.
The reason I go into length with this seemingly straightforward process is to highlight how much additional effort goes into taking care of this drone and its accessories.
Overview and Impressions
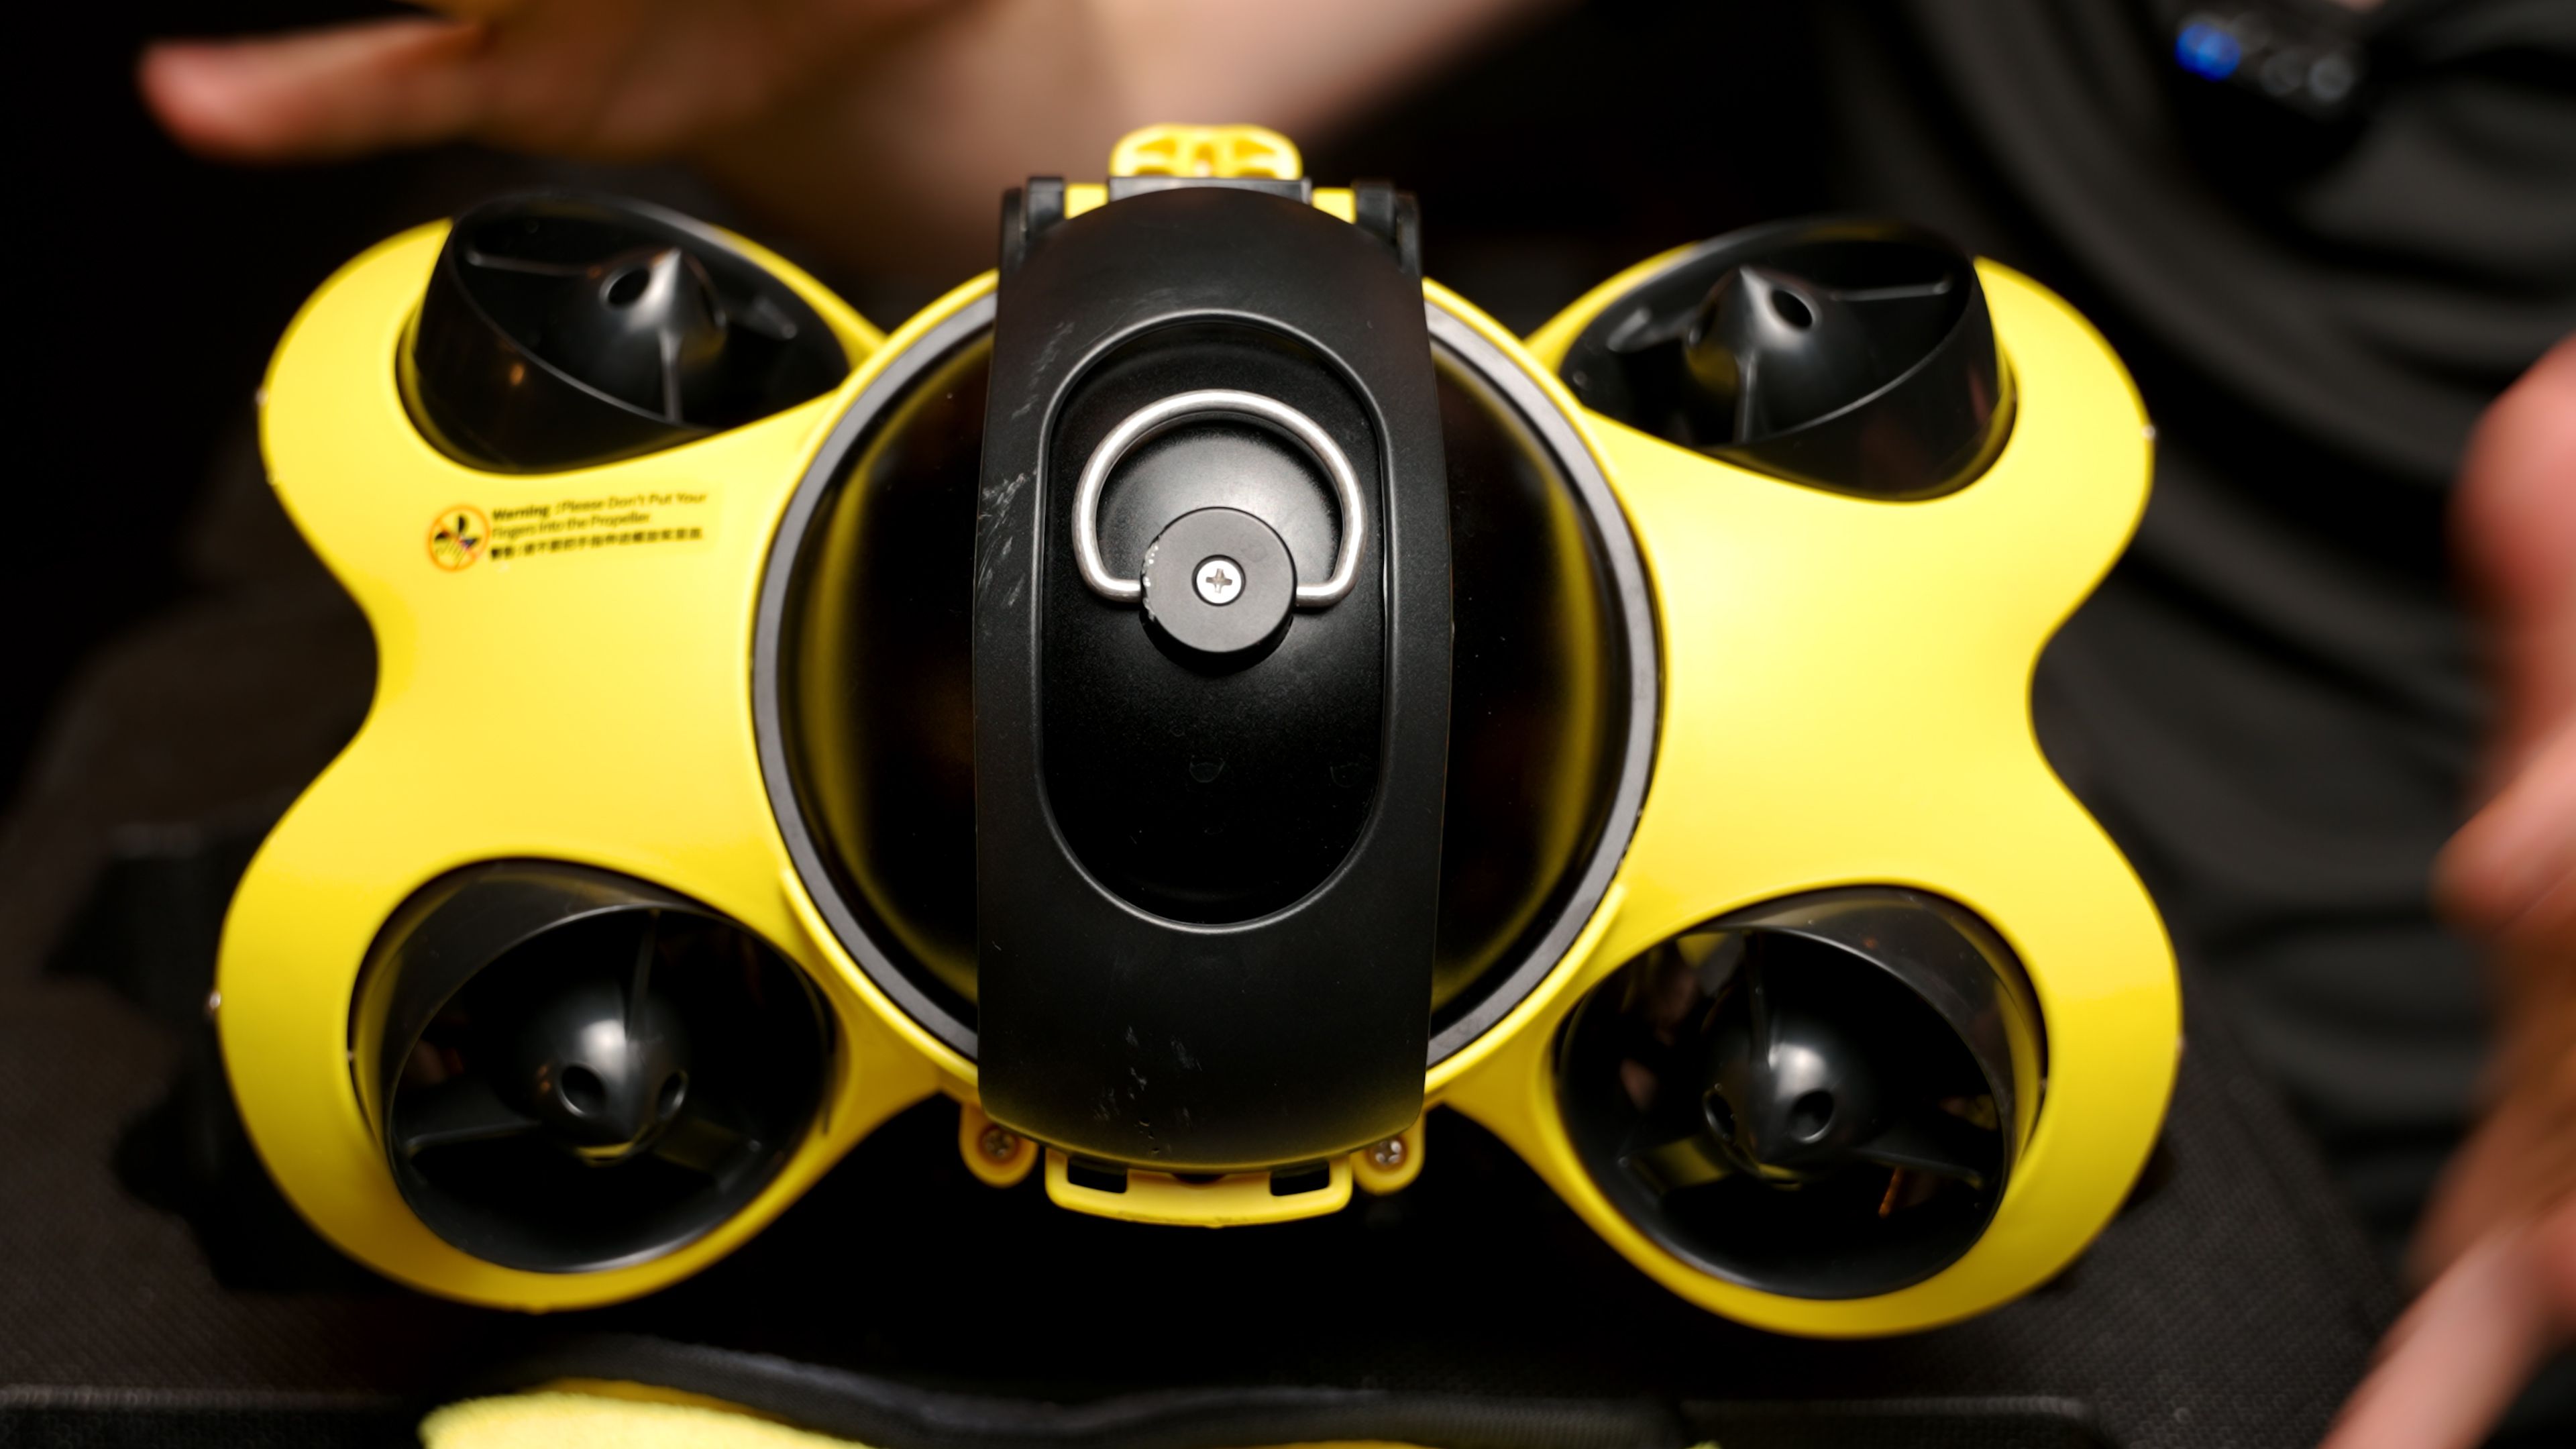
The Drone
The ROV itself feels like a tank and in no way can be mistaken for a toy. In the 20 or so minutes I took with my initial setup, I had about five different people stop and ask me what I had. It was a crowd-pleaser and conversation starter for sure. It reminds me a lot of when aerial drones were just getting popular and everyone wanted to know what you were doing.
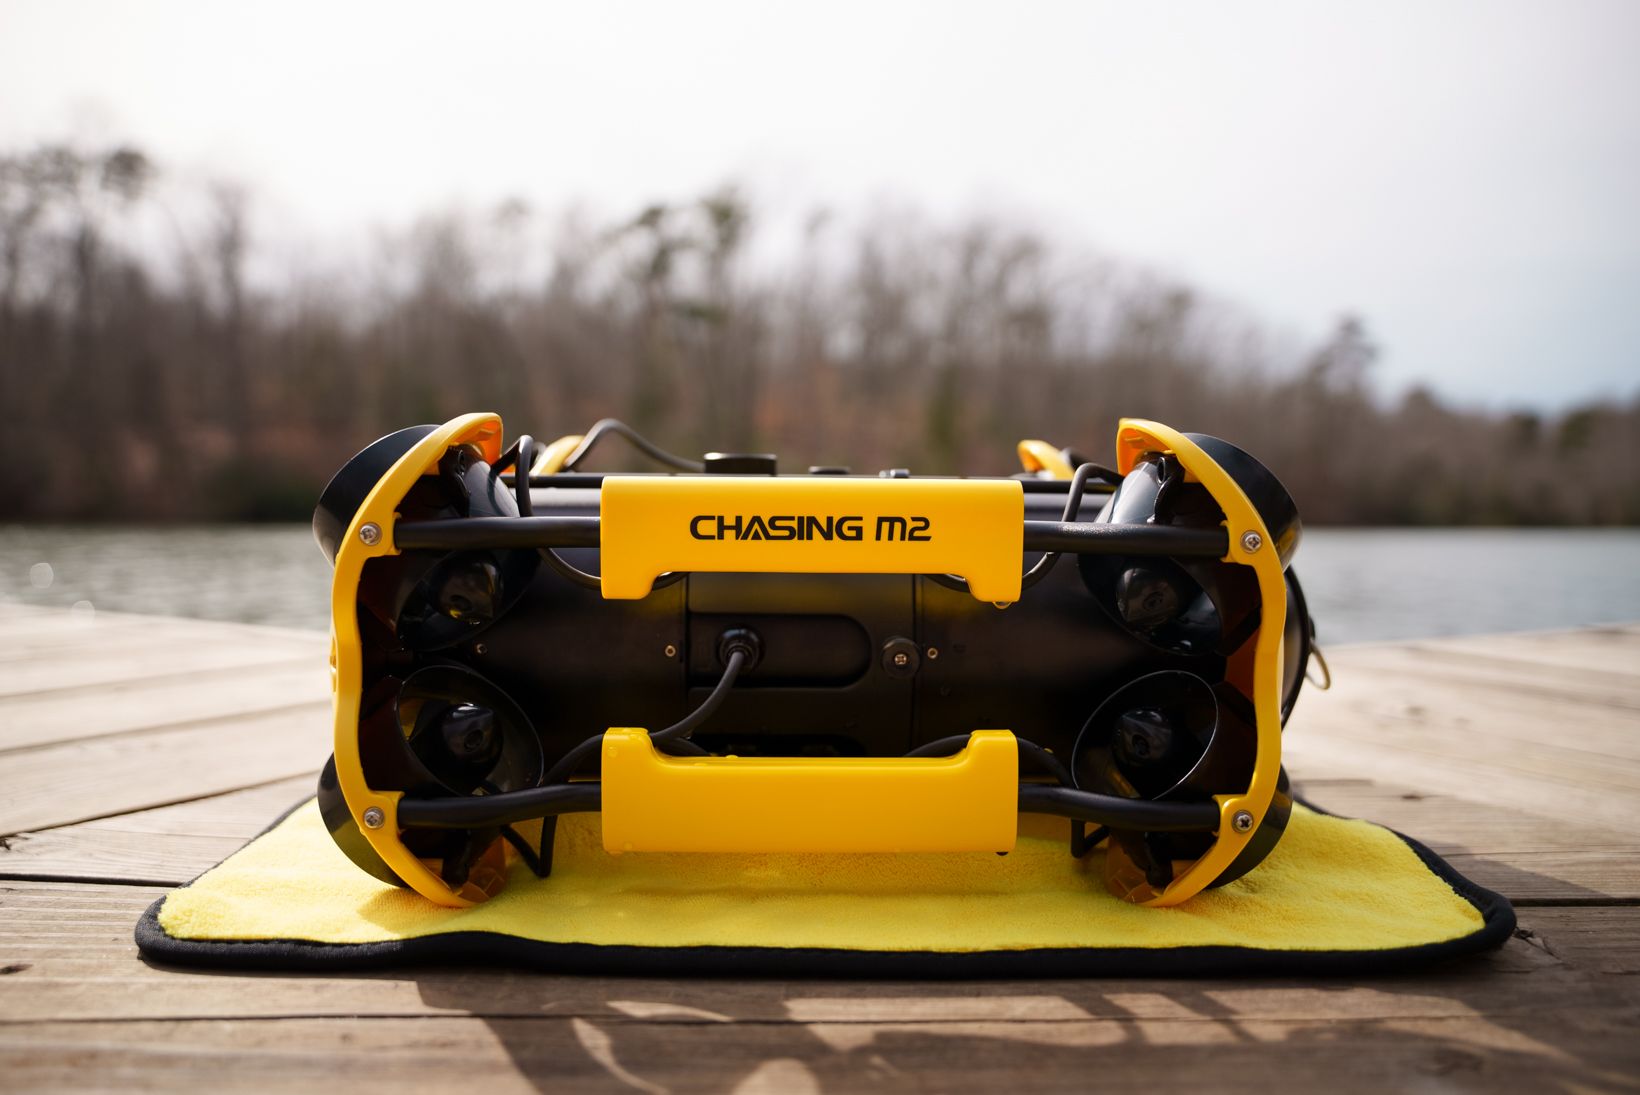
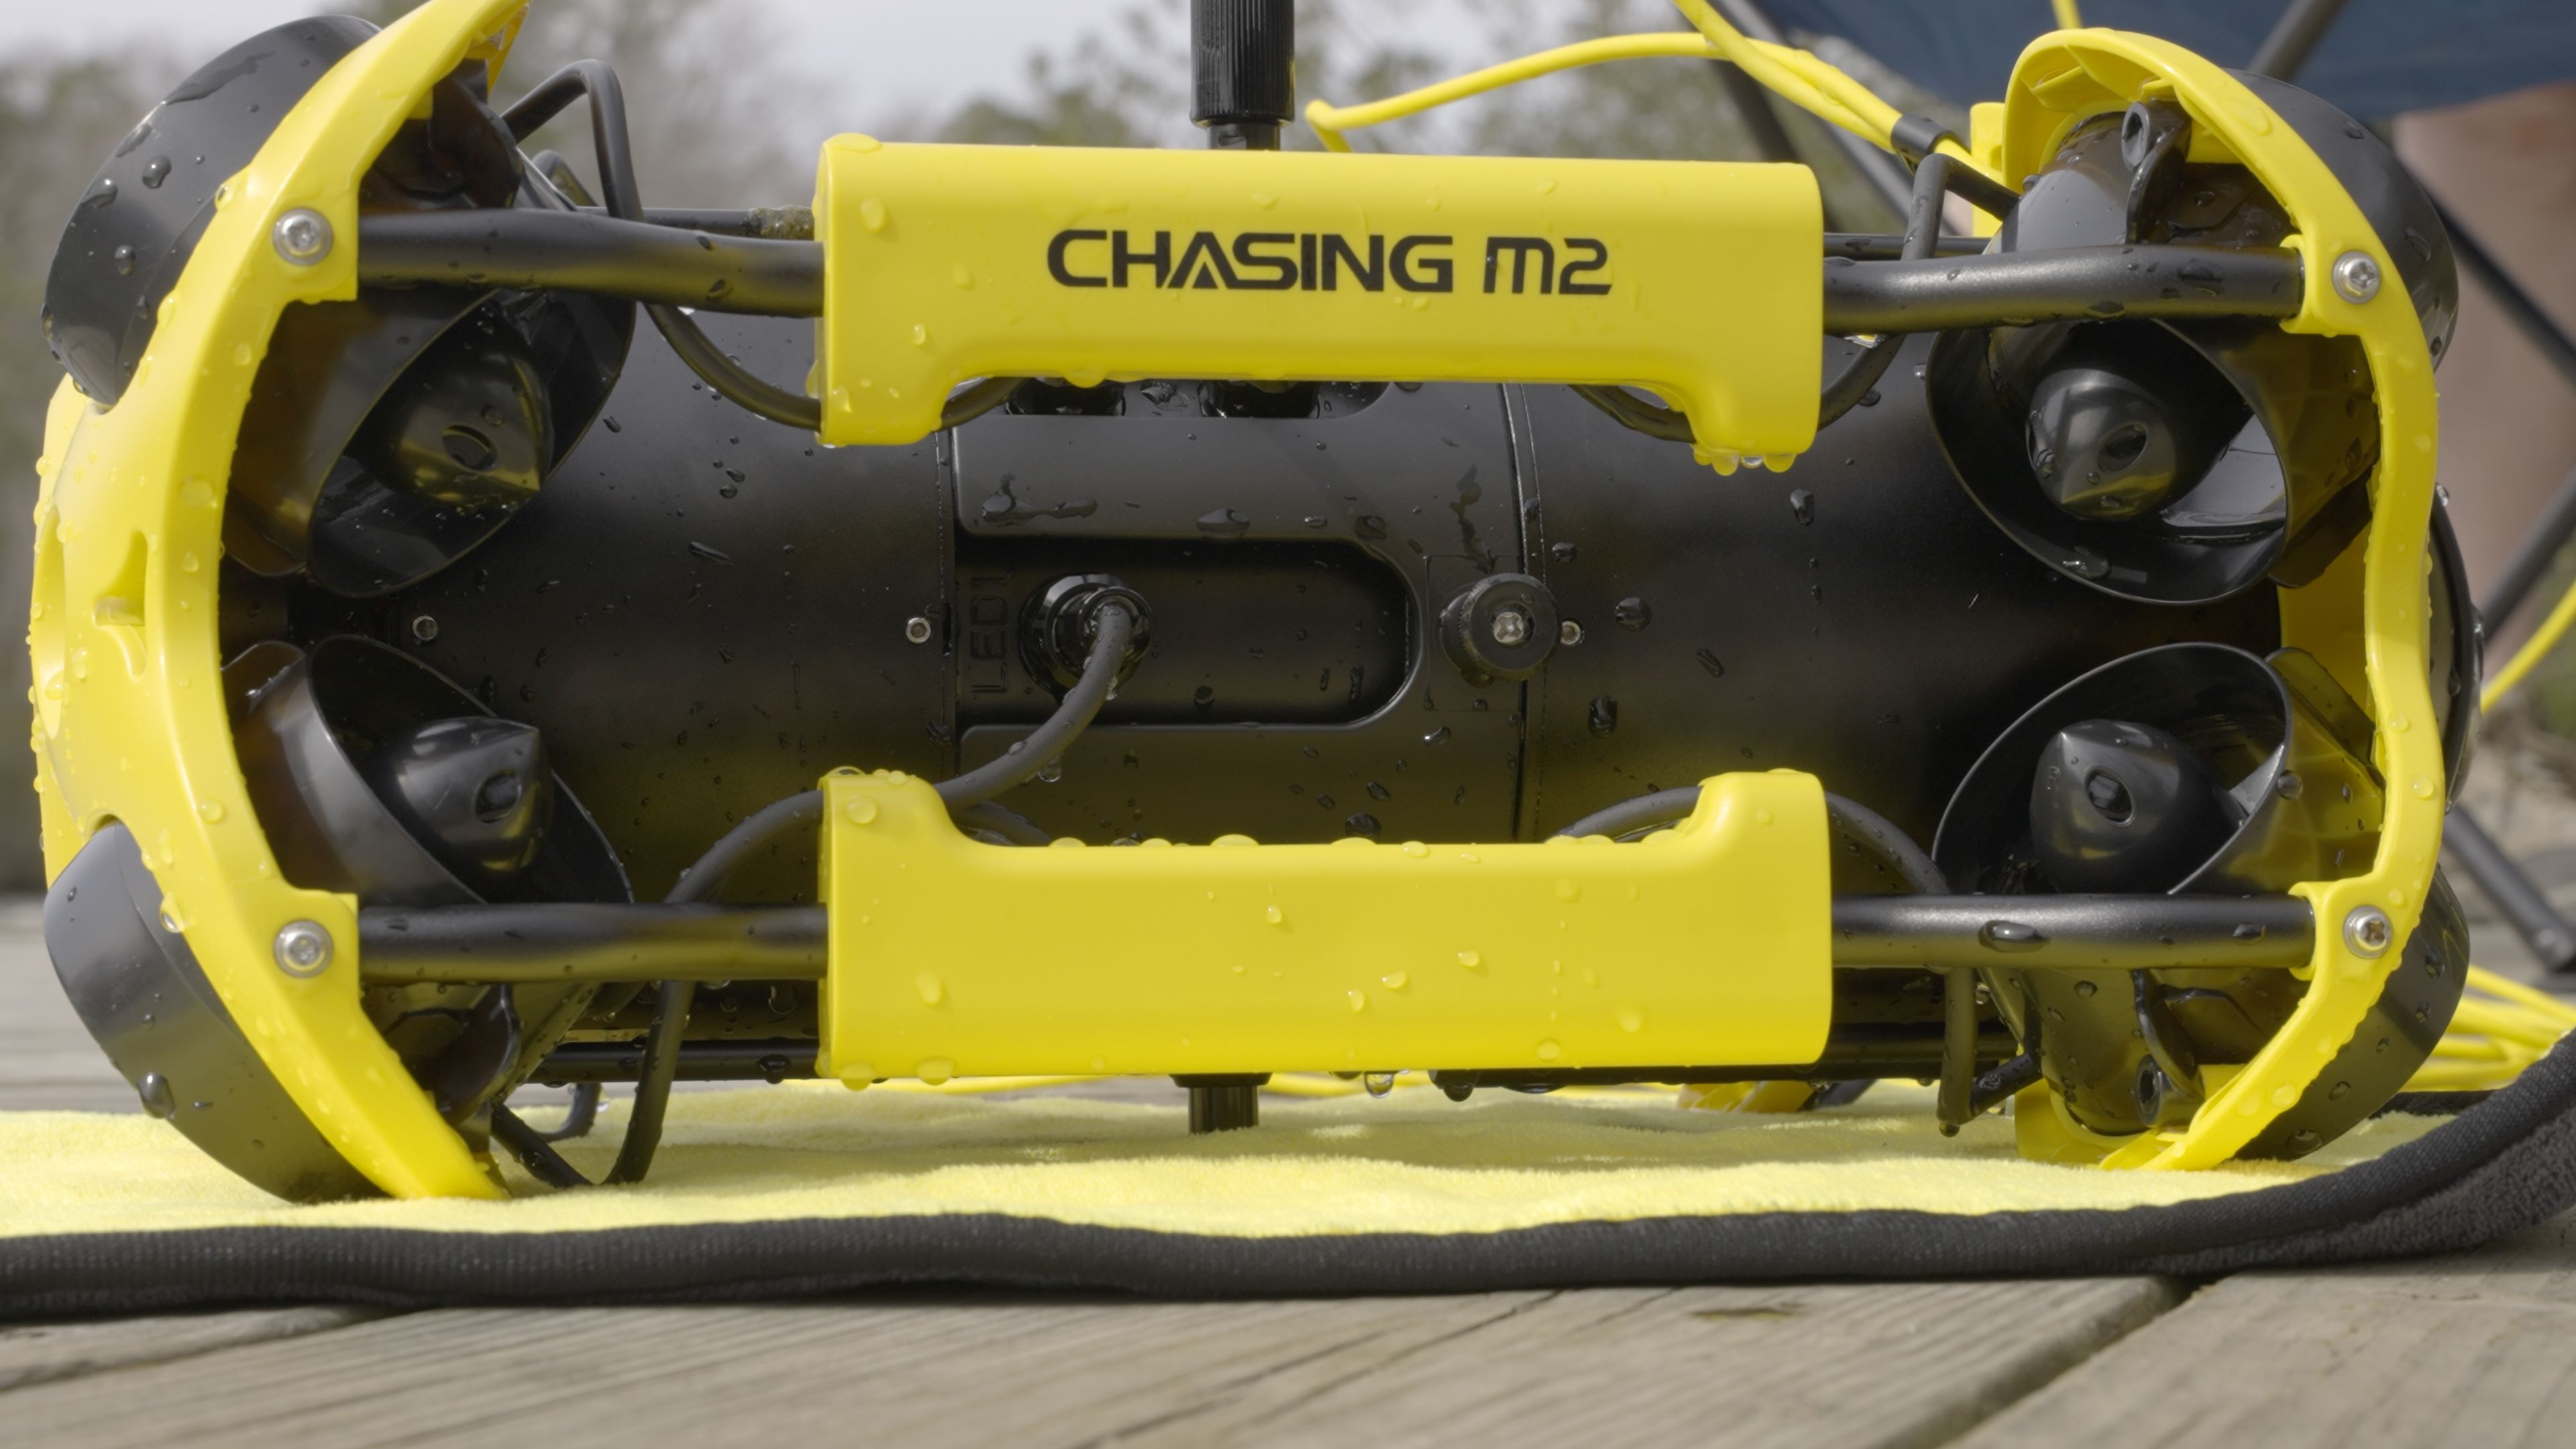
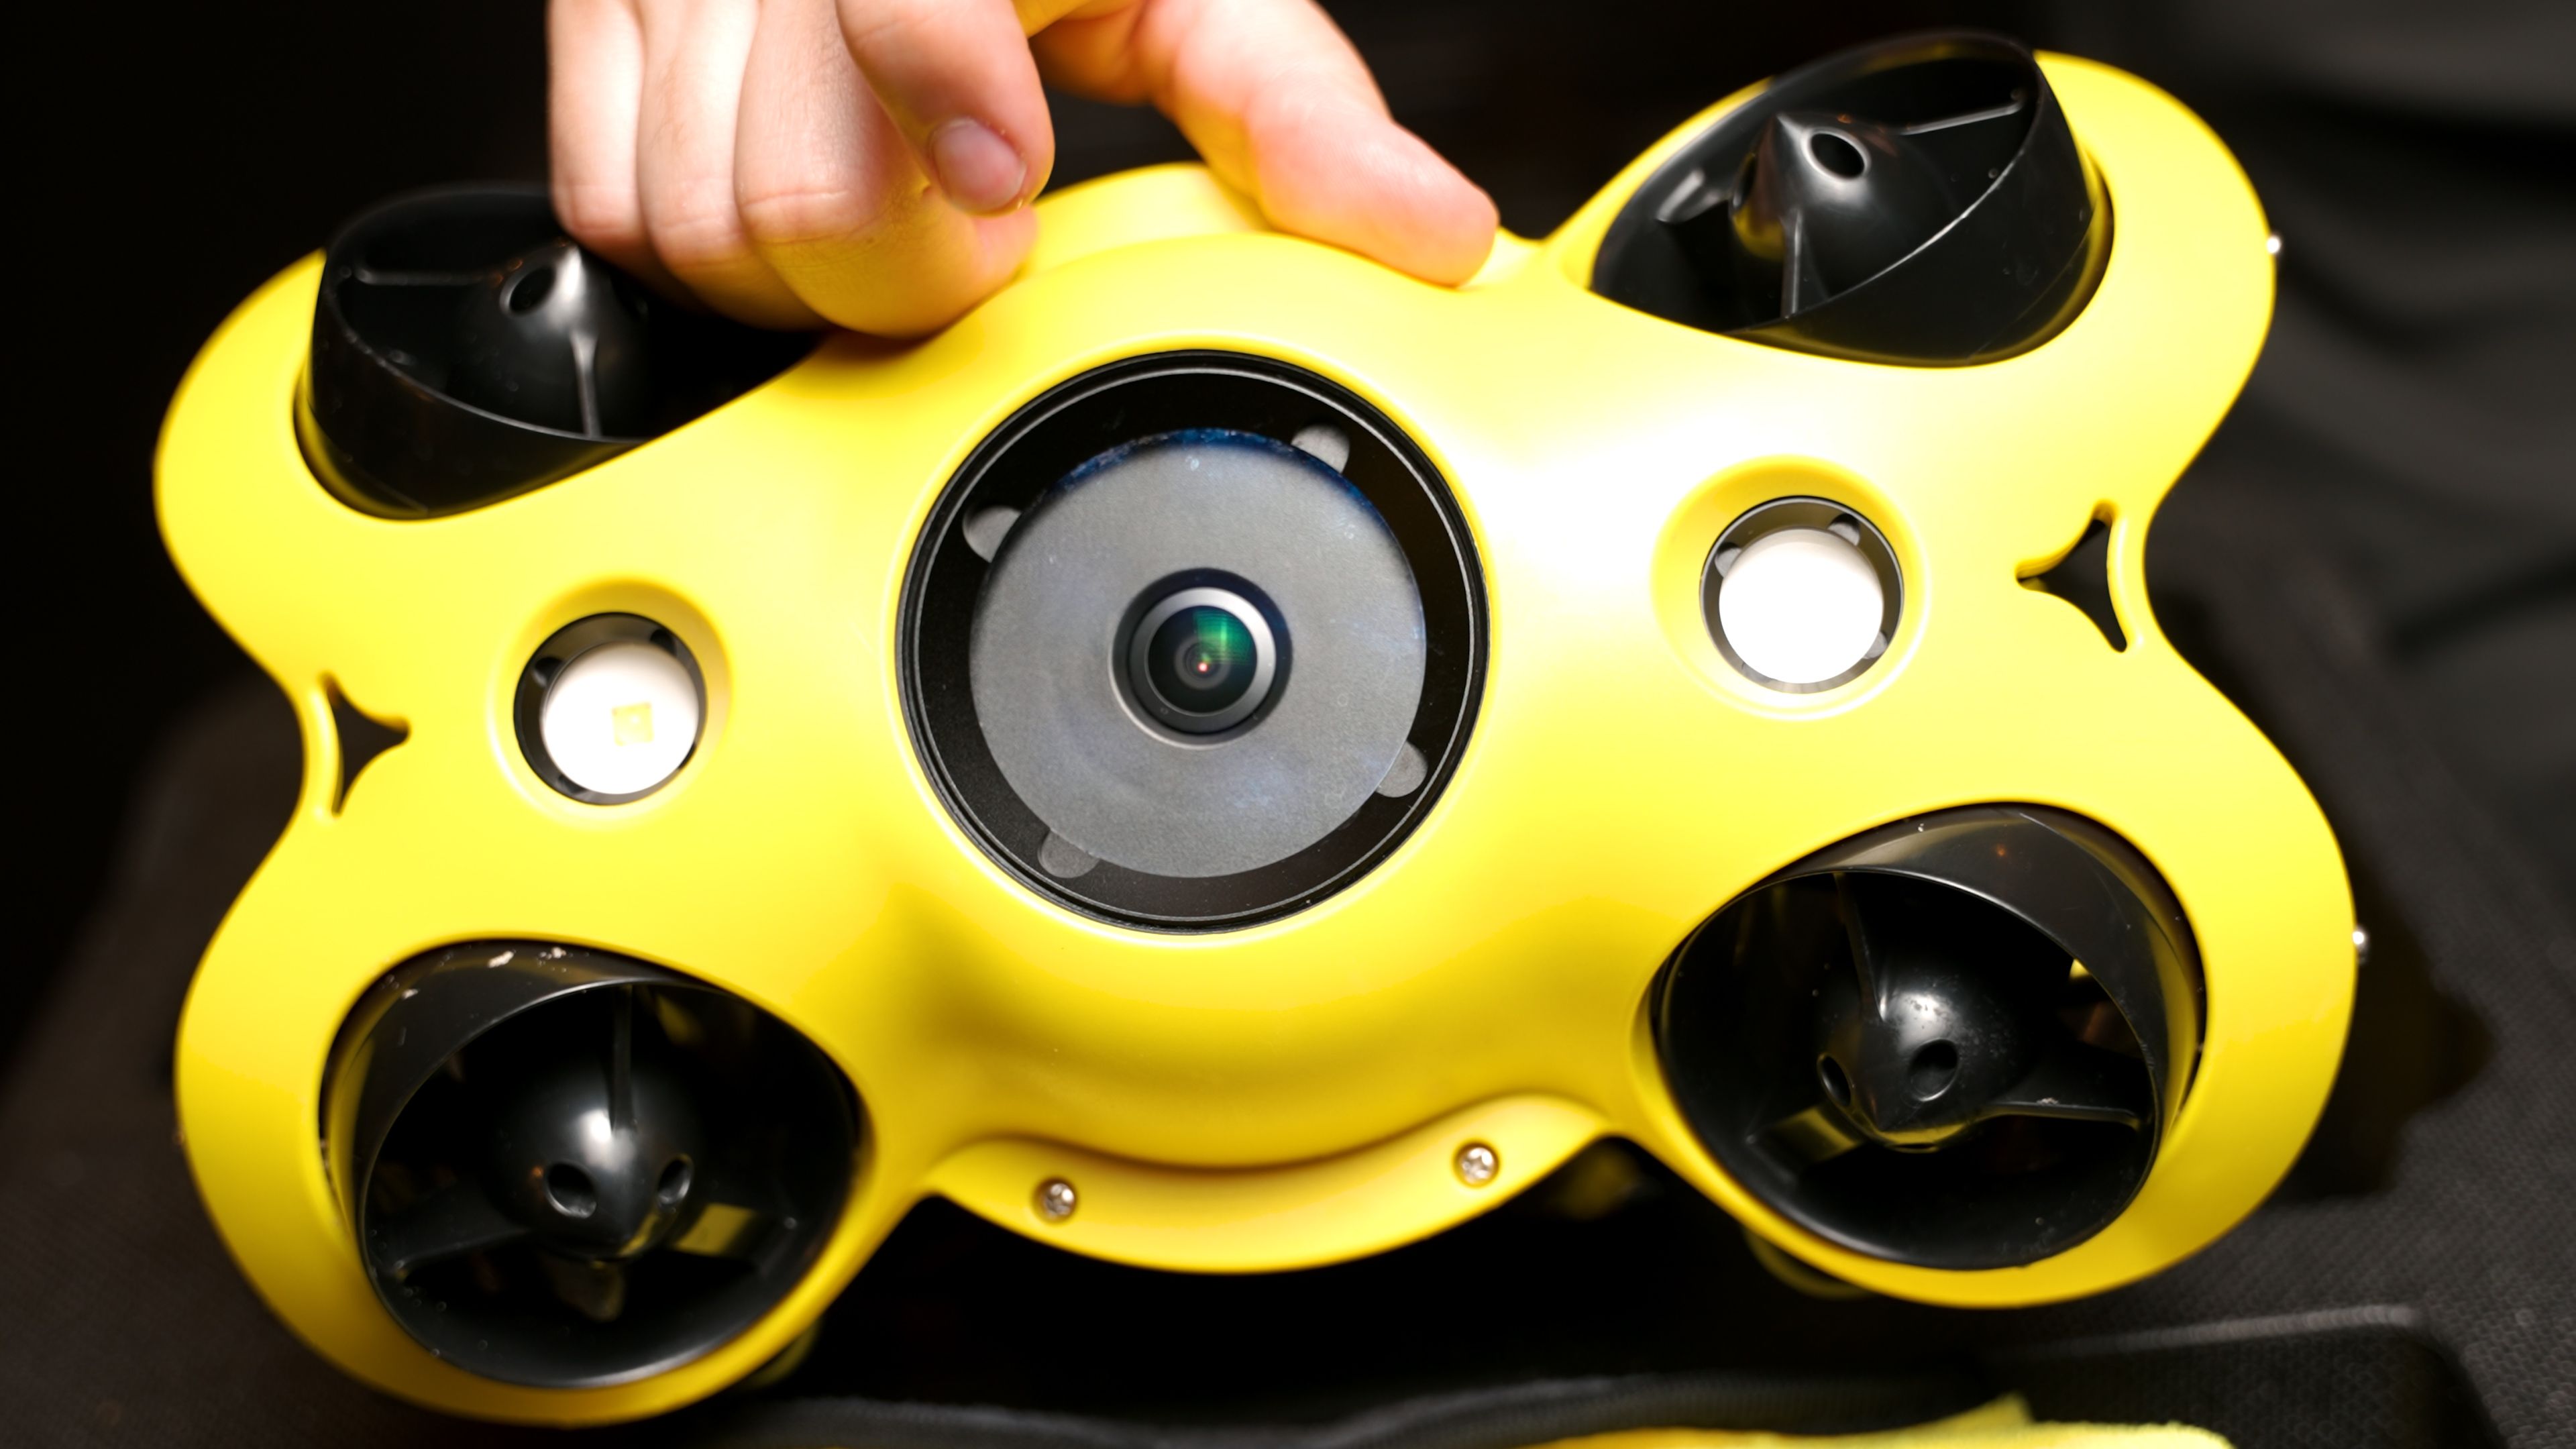
The front houses a 12MP 4K camera, attachment port, and two 2000 lumen LED lights (one on each side of the camera) to help you see where you're going.
Controls
My biggest recommendation would be to take this to a clear and calm body of water like a pool or lake for your first few tests. In my case, I found a nearby lake that had minimal obstacles. This allowed me to get used to all the controls and easily see how my inputs impacted the movement of the sub. This was the biggest similarity to using the DJI Mavic Pro 2. The two joysticks on both controllers operated largely the same.
What was new to me, though, was the tilt and roll dials on the rear of the M2’s controller. This introduced new movement options which I had never experienced before on a drone. Once I got the hang of it, I actually appreciated the tilt controls quite a bit as they are needed to position your camera. Unlike the gimbal on an aerial drone, the camera on the Chasing M2 can’t operate independently. It does take a little more effort to master these additional physical controls.
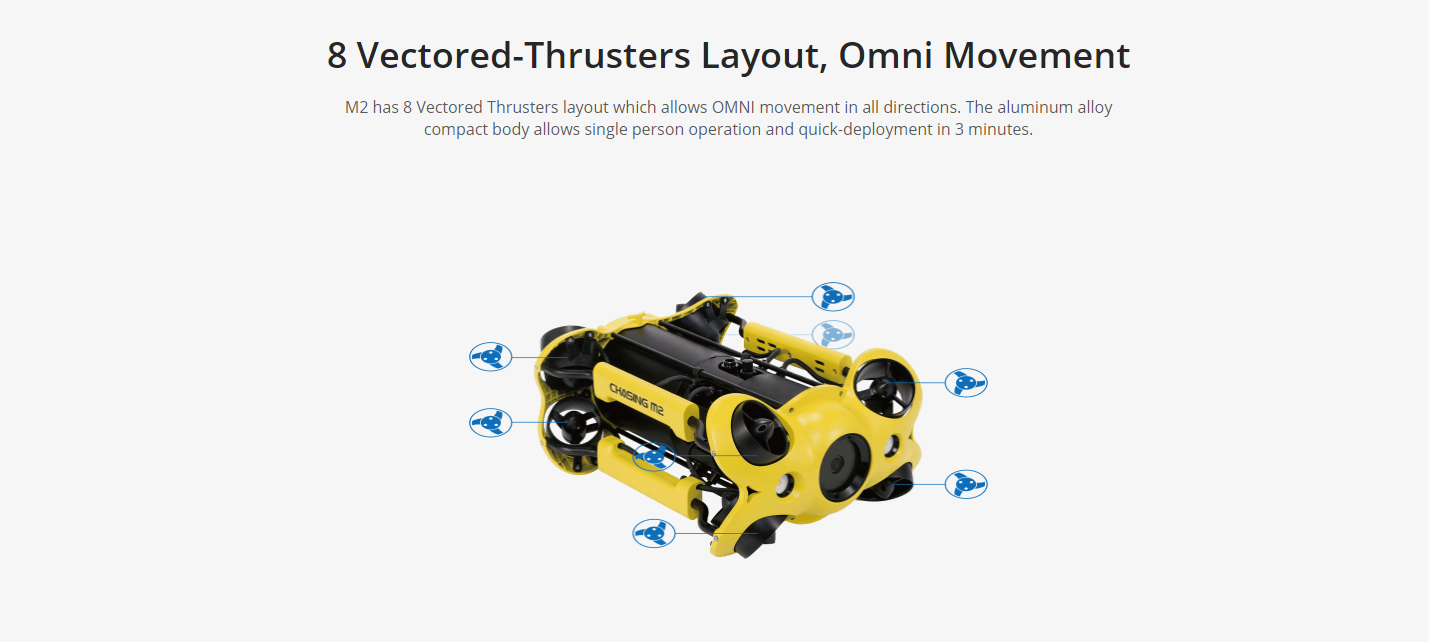
While most underwater consumer drones max out at six vertical/horizontal thrusters, the Chasing M2 has eight, uniquely oriented to help prevent it from getting stuck in debris. These powerful motors give the ROV very precise 360-degree controls with roll, tilt, and turns that are easy to get the hang of.
Overall, it handled lakes with small currents really well. It wasn't until I tried it out in a faster-moving river that I realized it wasn't up for the task and that I needed to quickly bring it back in, albeit with lots of effort.
Speed/Sound
Speaking of movement, the M2 has a top speed of 4.9 ft/s (1.5 m/s) in a still body of water. It was quick for sure and made it really fun to just zip around. Surprisingly, even at full throttle, it was essentially silent… like a real sub. The only time it was audible is when you’re operating towards the surface and the motors aren’t fully submerged. Descend a few inches, though, and its back to stealth mode. I actually found I could get relatively close to some geese and they had no idea I was there until I re-emerged.

Operation

The M2 is rated to last for 2 to 4 hours charge. The ROV has a removable 97.7Wh battery which charges in about 2.5 hours. Additional batteries cost $399 if you want to go longer between charges. The controller has a 2,500-mAh lithium battery which charges in 2 hours. Both the drone and controller can be charged at the same time using the included AC adapter.
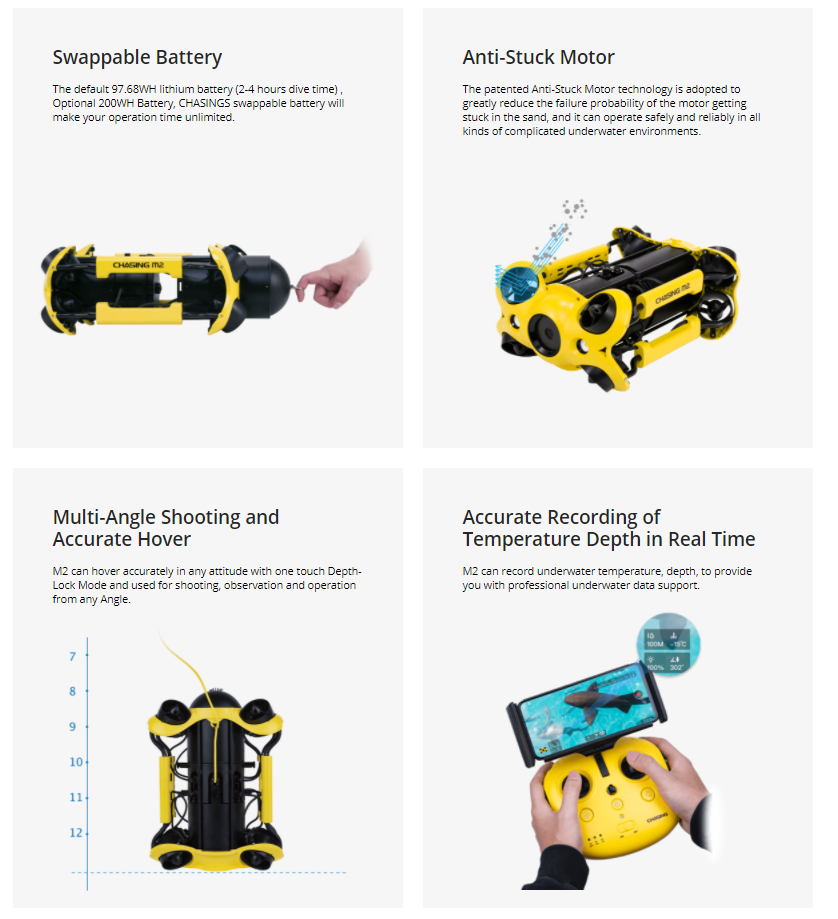
The ROV can be operated in temperatures from 14 to 113 ºF (-10 to 45 ºC). It can dive to 328 ft (100m) but I did not have the opportunity to take it that deep. If you plan on frequently hitting these depths, you'll probably want to choose their kit which includes the longer 200m (656 ft) tether cable vs the 100m that comes by default.
Camera & Live Viewing
The camera features a 1/2.3-inch Sony CMOS sensor with an F1.8, 152-degree wide-angle lens. Those 2 big lights on the front are going to come in handy as it gets dark quickly when you descend. You can record up to 4K videos and 12MP photos.
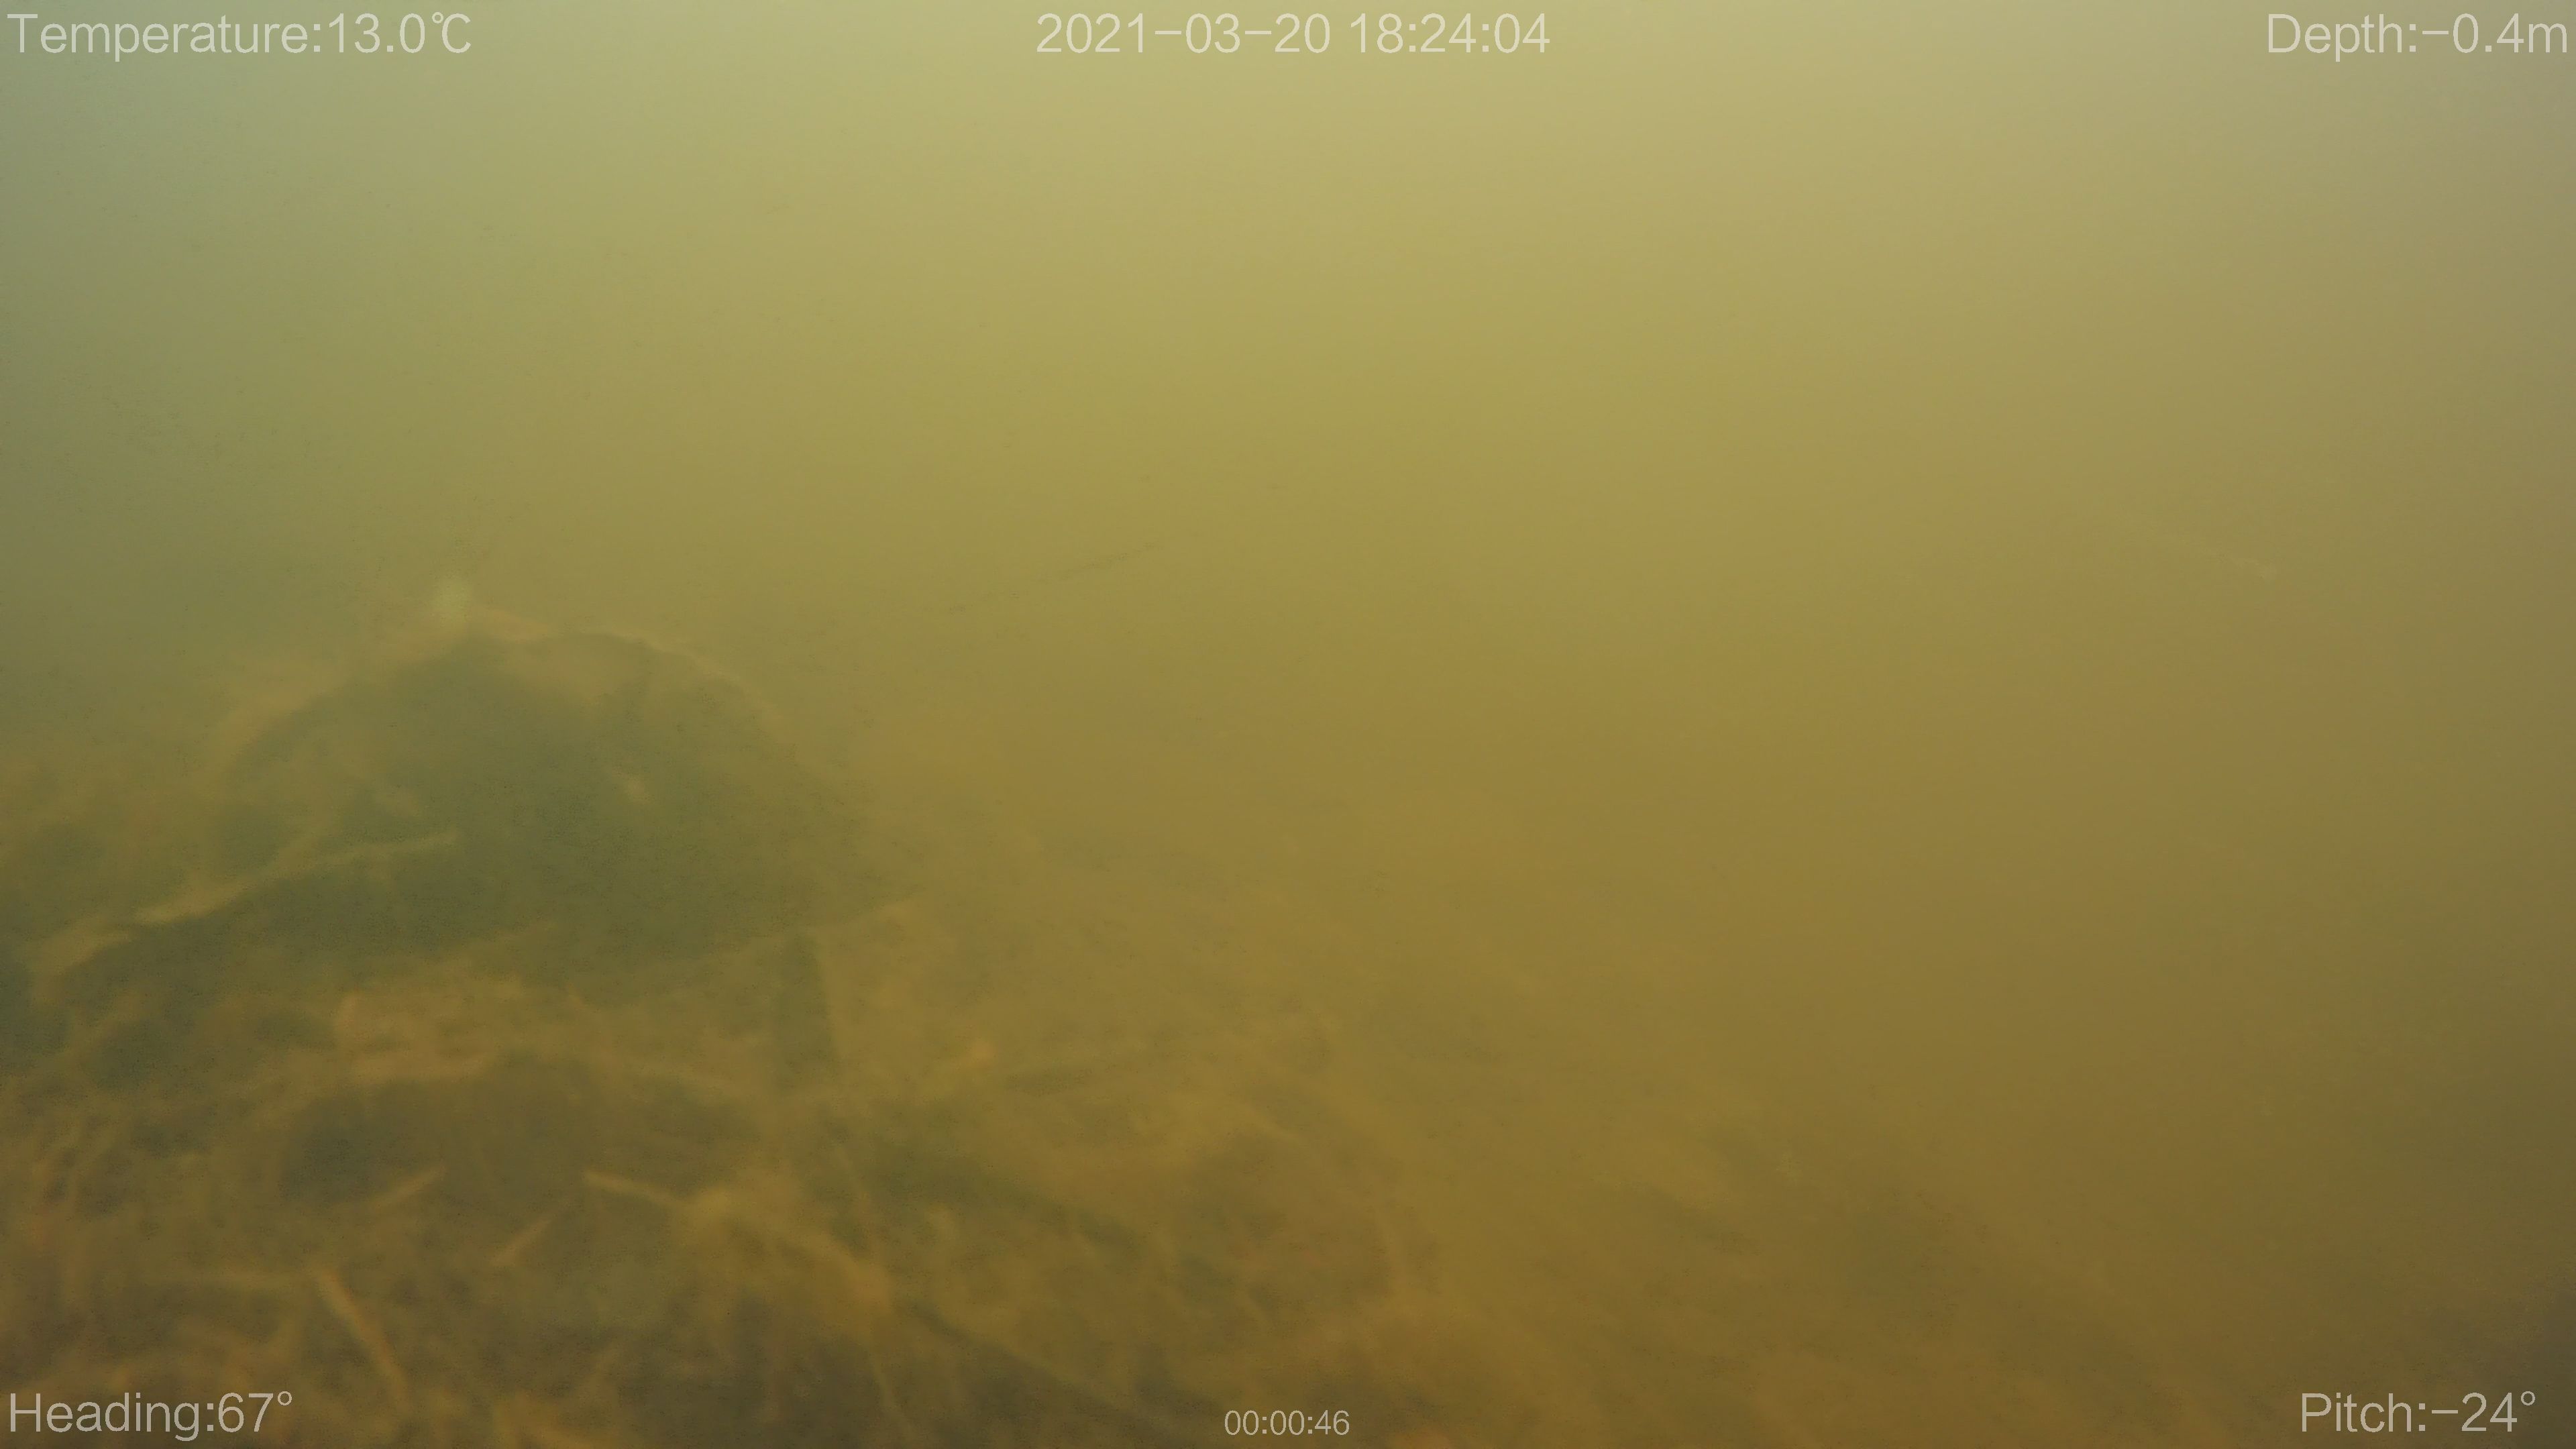
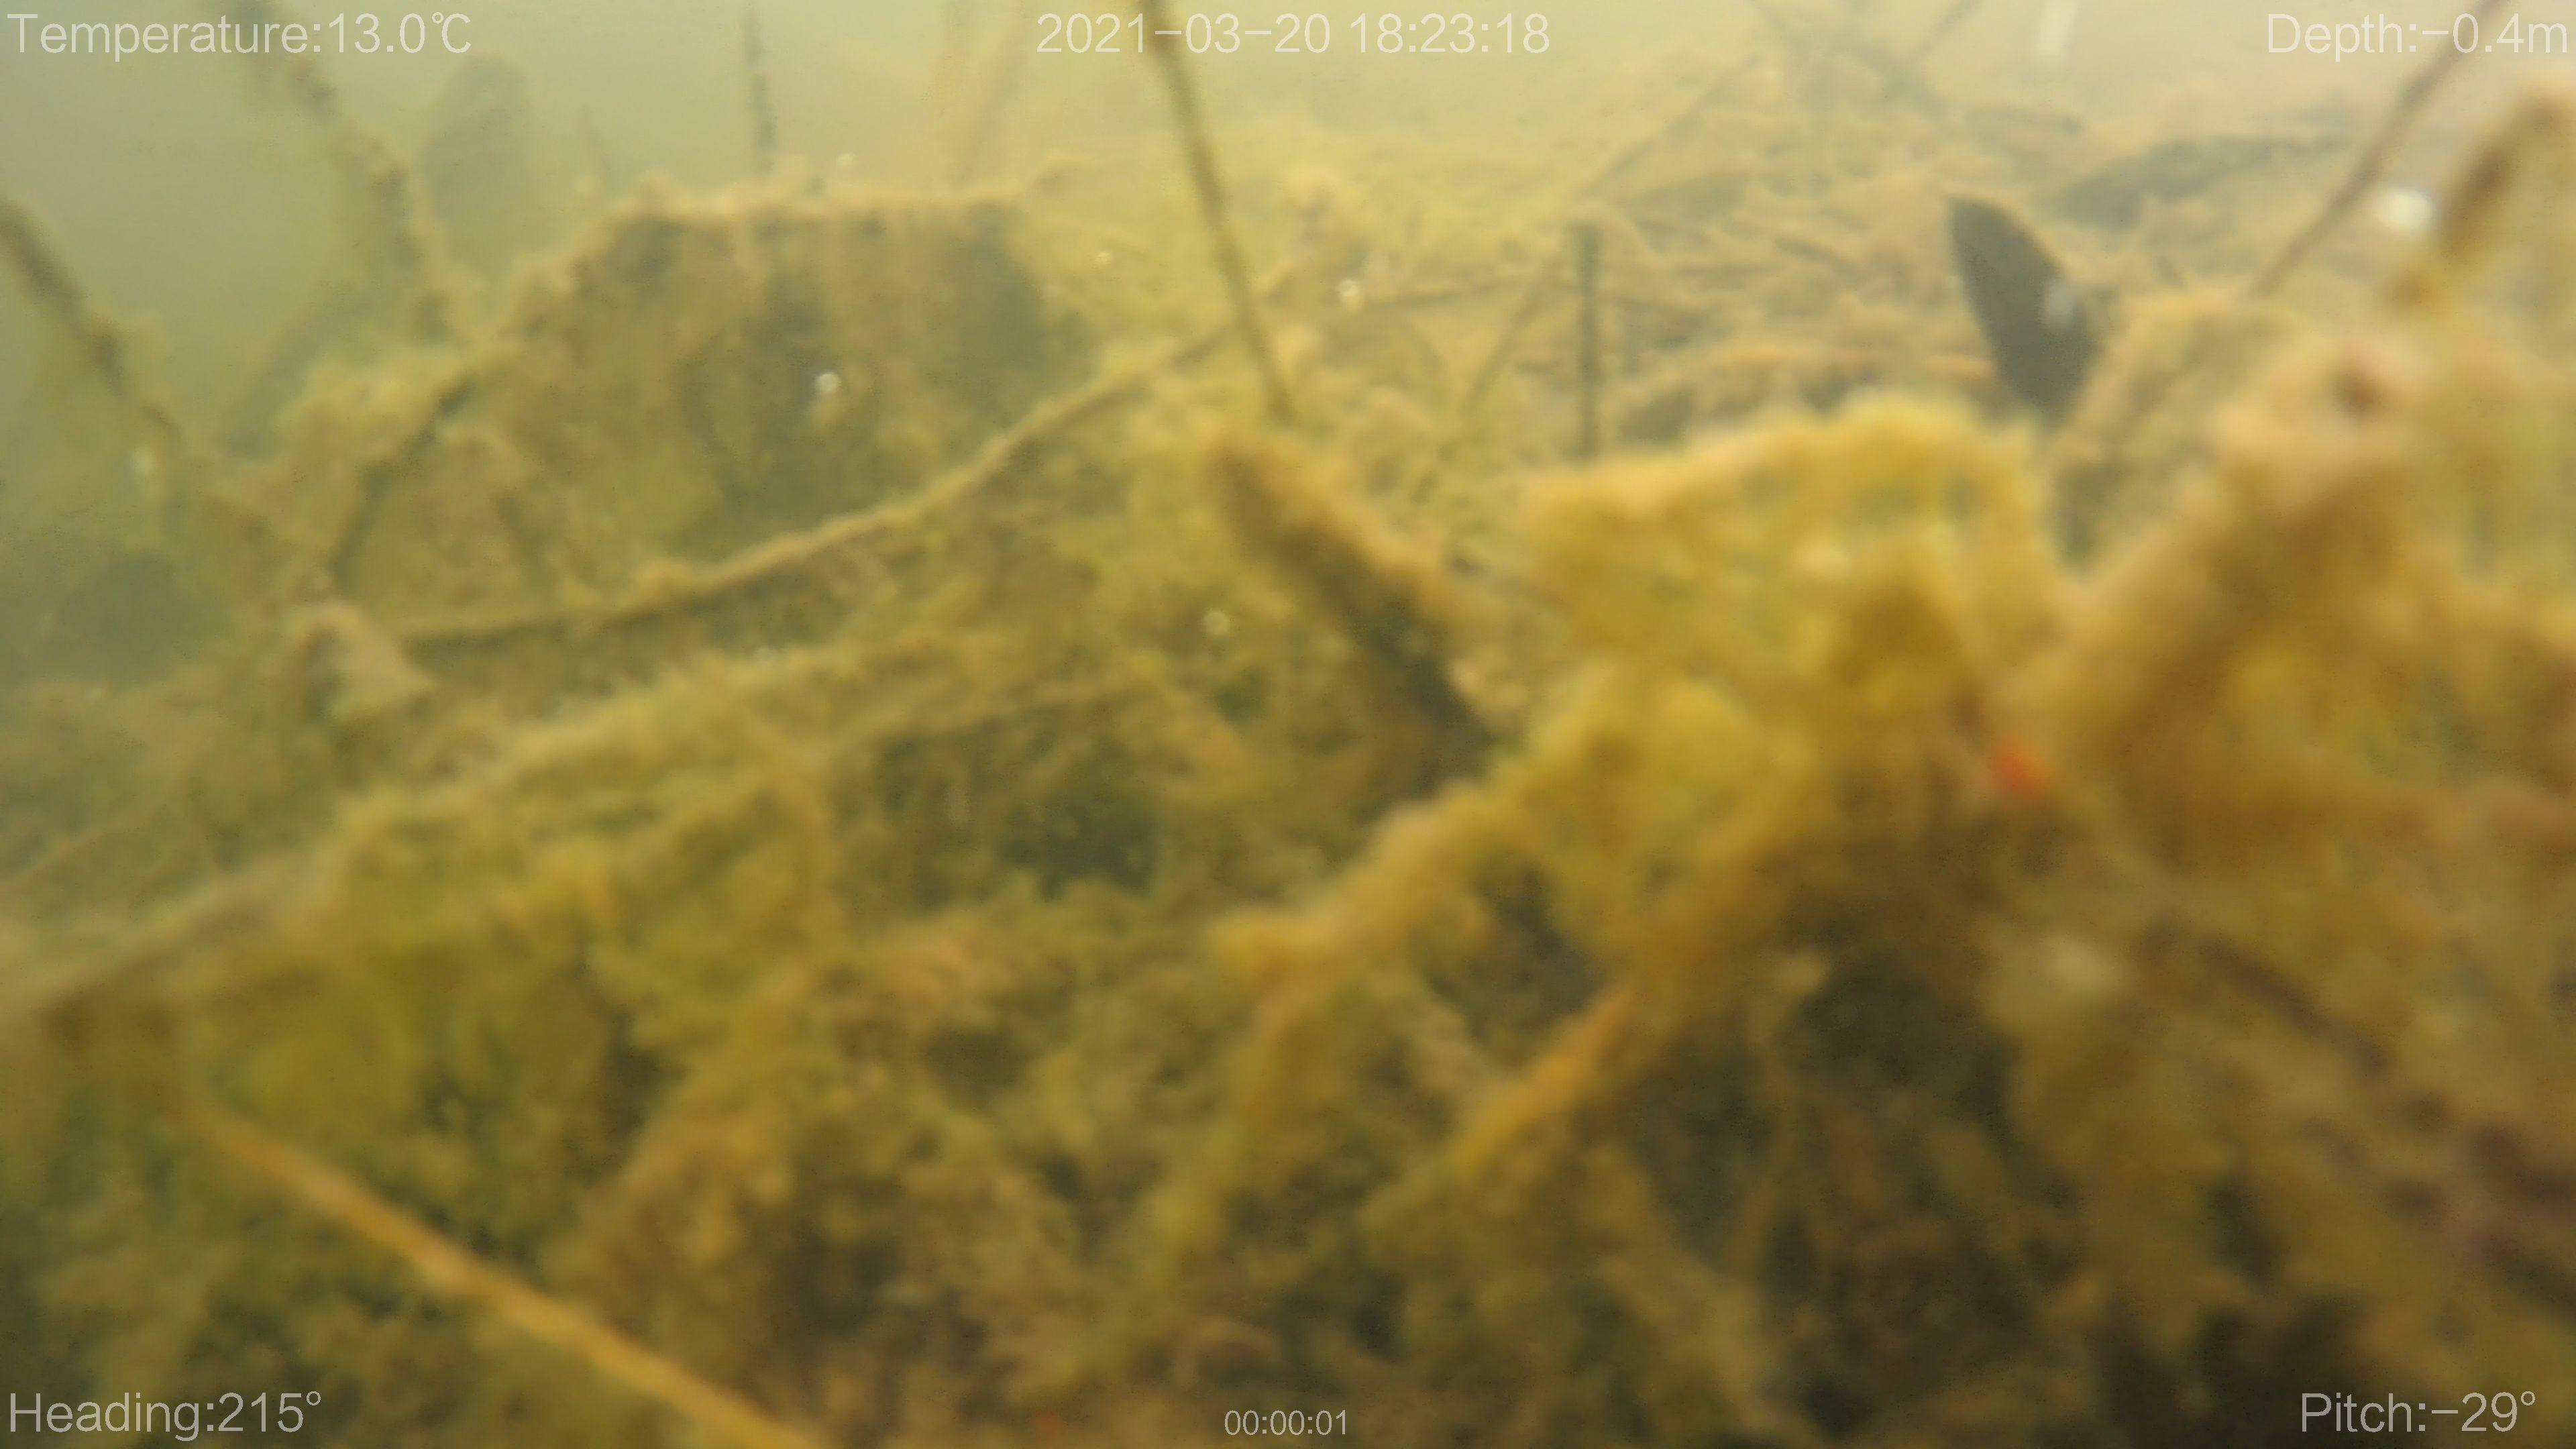
In terms of overall camera quality, it can be a little hard to judge as when submersed, you're dealing with lots of naturally occurring artifacts including sand, bubbles and other debris which distort your image. Overall, it has a very early Go-Pro, or action camera look and quality to it. Its not very sharp or vibrant, but that's kind of to be expected. I wouldn’t necessarily be buying this drone exclusively for its camera. You're not going to be amazed by the quality of the images and videos you take, but instead by the content itself, whether that’s some cool terrain, fish or other creatures.
If you really want to up your quality though, you can use its action camera attachments to use better waterproof cameras. I would really just rely on this built-in camera for live viewing and monitoring and invest in a better camera to attach to if getting the best photos and videos was a priority.
On the other hand though, I was surprised that when you connect to the app, you have several options to tweak your image with ISO, white balance, as well as change your frame rates and resolution. It maxes out at 4K 30FPS at a bitrate of 60MB/s, but I would have liked to see a 4K 24FPS option as well. Additionally, EIS (Electronic Image Stabilization) can be turned on via the app and helps eliminate most of the shake in your footage.
Whether or not you can actually tell what your camera is looking at is another question. The thing with underwater drones is unless you have very, very clear water, its difficult to see where the drone is relative to its surroundings. The lakes I took the drone to had relatively clear water to the point that I could see the drone even when it went down a few feet. But unless you’re operating in crystal waters, like the kind you see in snorkeling videos, it’s not easy at all to tell what’s actually going on.
I found it useful to get low to the ground and have the drone tilting downwards so that I could at least see what was directly below me more easily. You’ll want to minimize the thrusting movement as it'll result in sediment floating everywhere. You can apply this same strategy for getting very close to other objects too. But unless you’re surveying or know of something specific to navigate up or next to, it’s going to be very difficult to find just by using the visuals provided by the camera.
Schooling the Fish
From my research, while there are several competing underwater ROVs, many of which cost far less, the Chasing M2 is unique in that it offers several accessories, attachments and additional features. Chasing has a wide selection to choose from on their site including an E-reel to speed up the setup and tear down process.
Tools and Attachments
The M2 can also support attaching add-one weighing up to 3.3 lbs (1.5 kg). Up to 1.5 kg (3.3 lb) of tools such as additional cameras or lights can be mounted beneath the camera. Chasing even offers an optional grasping arm, for an extra $499, allowing users to not just see their environment, but also interact with it. I did not get the opportunity to try this out, but I would imagine it being a big selling point for those looking for certain retrieval or more basic arm functions underwater.
Aside from offering this grab arm and a brighter diving light which costs $1299, the M2 might get you interested in other possible attachments and upgrades as well.
The M2 I’ve been testing out is the second-highest model Chasing offers. For most, this will probably be all you need, especially if you’re focus is on taking videos, photos or just having more casual fun with it.
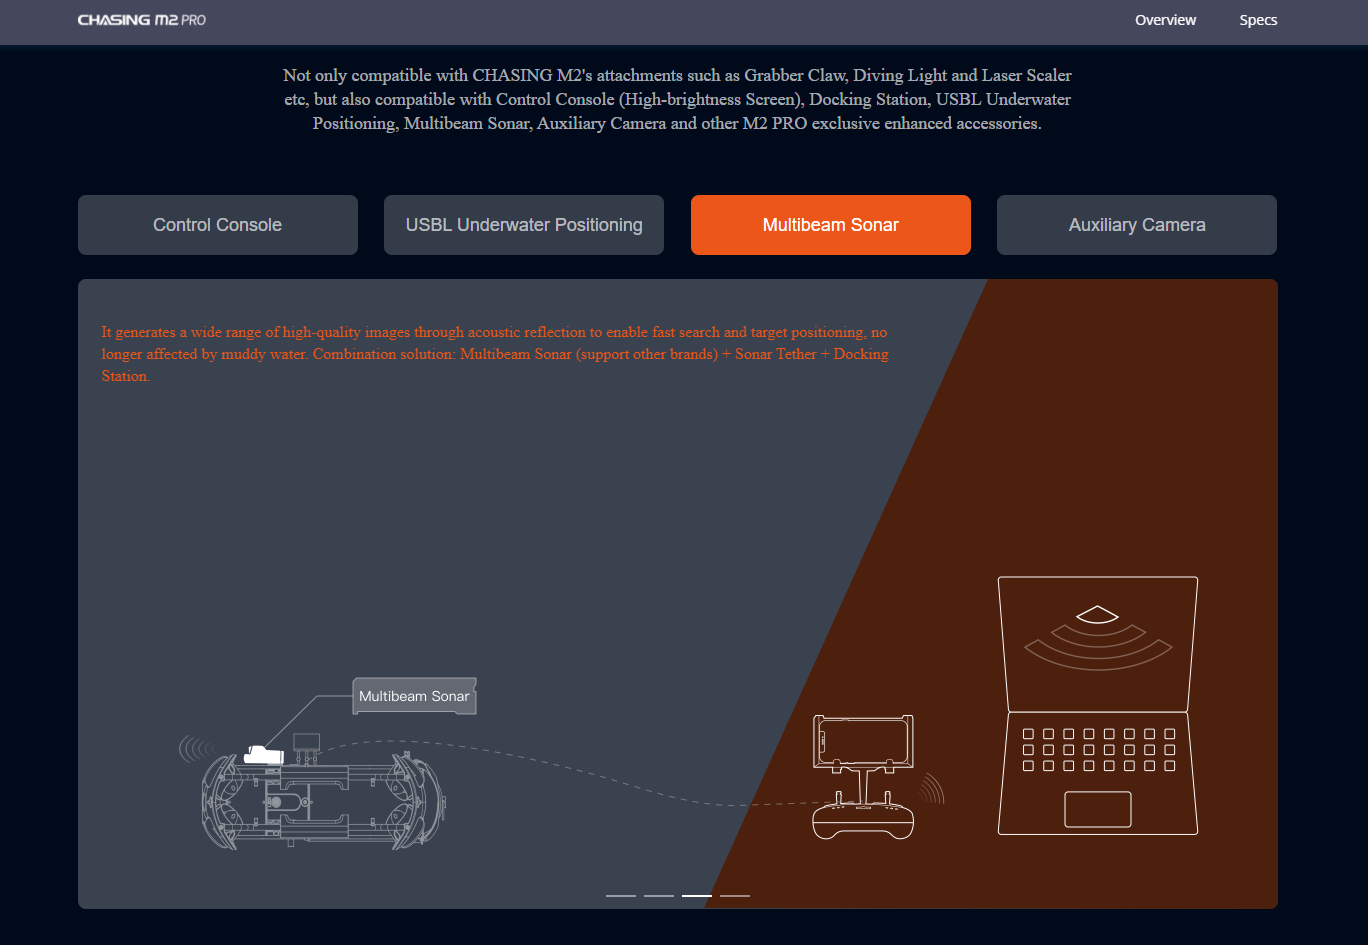
If, however, you plan or using this in a more professional work including search and rescue, inspections or surveying, you‘ll likely want the advanced capabilities of their M2 Pro. The Pro looks identical to the M2 but is more powerful, can go deeper and is compatible with additional attachments including sonar, cameras and transmitters. Many of those attachments look like they could make the ROV far more useful, yet do cost quite a bit on top of the nearly $2000 price difference between the ROVs themselves.
I would argue that some of these attachments, especially the sonar, would actually still be handy for even more casual users, and I actually found myself wanting some of them (despite not knowing they or even the M2 Pro even existed) during my initial tests.
Value and Best Uses
This next point isn't going to be a direct disadvantage to the Chasing M2 specifically, but rather underwater ROVs in general. Finding the best uses for an underwater drone might prove challenging. Its not because the M2 isn't capable, but rather because of the water you're limited to or the practical applications you can use it for under these less than perfect conditions.
While the Chasing M2 isn’t the top of the line model with all the additional sensors and modules, I almost feel like they’re necessary to still make the drone practical for the 90% of water which isn’t crystal clear, otherwise, it frequently feels like your operating by guessing or pre-surveyed areas, rather than having the ROV do the work for you.
The drone itself is stellar and has amazing controls. The biggest area it could improve upon, however, is helping users better understand its position relative to its surrounds so that it feels less like you’re operating blind. The M2 sits in an interesting position where it can be a very powerful tool for the right job, but in trickier (less clear) or brand new waters, it almost feels like the M2 Pro would be a necessary upgrade for most.
If you’re more of a hobbyist or looking to use primarily for photos or videos, you’ll only get the best use out of this if you have some nice, clear waters to use it in. At almost $3000, however, you’ll need to consider this drone as a whole, the setup, operation and all the other details, to determine if it’s a good choice for you.


0 Comments