Sending emails from the Linux terminal is necessary, especially when you're automating emails using a shell script. Email programs like Thunderbird and Evolution might seem like the go-to tools, but they can feel bloated at times. If you are comfortable working with the command line, it might be beneficial for you to send/receive emails via Linux's very own heart system.
You can configure Gmail and other email clients within Linux to access your mailbox, send emails, and respond to emails from the terminal directly. To access your mailbox, you will first need to configure Mutt, which will make things easier for you in the long run.
What Is Mutt?
Mutt is an open-source text-based email client used to transfer/receive emails among hosts while using the Simple Mail Transfer Protocol (SMTP). To install Mutt, you need to follow a few commands, and then you can configure your Gmail mailbox with ease.
Mutt’s Features Worth Reckoning
Before you dive in, you would want to know what makes Mutt so special for Linux. Here are some features that would convince you of Mutt's true mettle as a mailbox handler:
- It's easy to install and configure.
- You can send emails with single/multiple attachments, right from the command line.
- Mutt allows you to send mails to recipients in the CC and BCC sections.
- It wholeheartedly supports message threading.
- Utilize the excellent feature of mailing lists.
- You get support for different mailbox formats like mbox, maildir, MMDF, and MH.
- It's available in at least 20 languages.
- Mutt supports the DSN (Delivery Status Notification) feature.
How to Install Mutt on Linux
Since Mutt isn't a standard Linux package, you won't find it preinstalled on your system. You'll have to manually install the package using a package manager.
On Ubuntu and Debian:
sudo apt-get install muttYou can install Mutt on RHEL/CentOS using YUM:
sudo yum install muttTo install the package on Fedora:
sudo dnf install muttOn Arch-based distributions, you can install the package using Pacman:
sudo pacman -S muttHow to Configure Mutt on Linux
As the first configuration step, you have to create a few directories where the system will store mails, headers, and certificates post-installation.
Issue the following commands one by one:
mkdir -p ~/.mutt/cache/headers
mkdir ~/.mutt/cache/bodies
touch ~/.mutt/certificates
Create the Mutt configuration file using the touch command:
touch ~/.mutt/muttrcOpen the muttrc file using your favorite text editor:
sudo nano ~/.mutt/muttrcOnce the editor opens up, it's time to start filling in your mailbox's IMAP and SMTP details to populate the mailbox's settings for incoming and outgoing mails.
Here are the settings:
set from = "username@gmail.com"
set realname = "First Last"
# IMAP settings
set imap_user = "username@gmail.com"
set imap_pass = "<mailbox password>"
# SMTP settings
set smtp_url = "smtps://username@smtp.gmail.com"
set smtp_pass = "<mailbox password>"
# Remote Gmail folders
set folder = "imaps://imap.gmail.com/"
set spoolfile = "+INBOX"
set postponed = "+[Gmail]/Drafts"
set record = "+[Gmail]/Sent Mail"
set trash = "+[Gmail]/Trash"
This example demonstrates how to set up a Gmail account using Mutt. Make sure to replace username, First, and Last in the above snippet with your email address username, first name, and last name respectively.
Deciphering the Commands for Email Settings
- From: Sender's email ID
- Realname: This will be your name, which would appear on the email.
- IMAP_user: This is your email address.
- IMAP_pass: Your email password, in case you are sure no one else will be accessing your mailbox.
- SMTP_url: The first part defines the URL where your mailbox will send messages for delivery.
- SMTP_pass: Mailbox password
- Folder: Location of your mailbox
- Spoolfile: The folder inside the mailbox, where emails arrive.
- Postponed: This references the folder to store postponed messages (drafts).
- Record: The directory where Gmail stores sent messages.
- Trash: The directory to store deleted emails.
Gmail’s IMAP and SMTP Configuration Settings
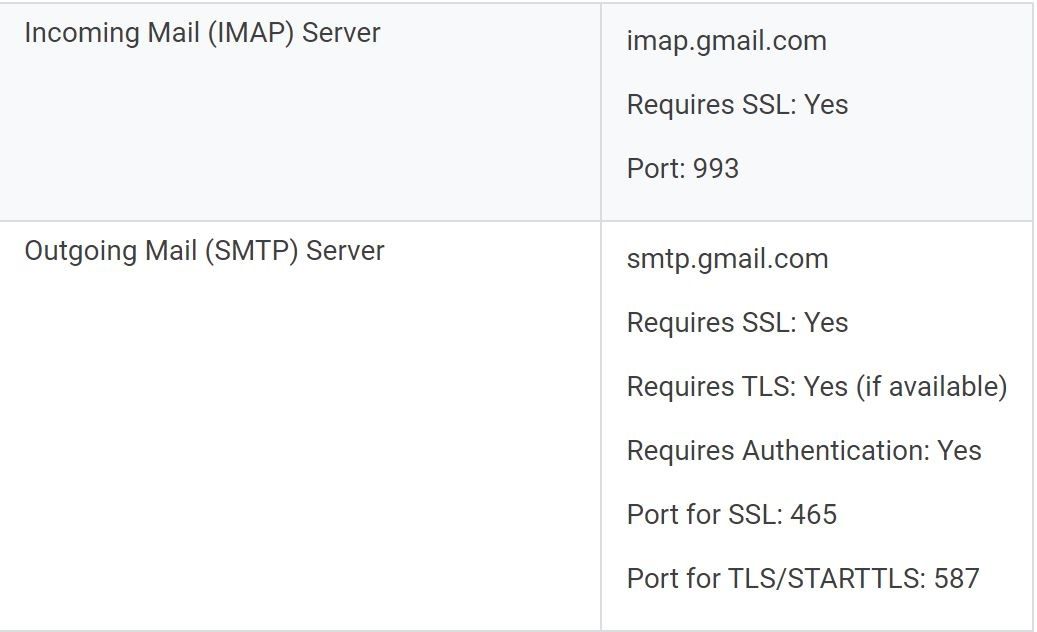
Most often, your mailbox's IMAP and SMTP port numbers tend to remain the same. For the best results, it's always recommended you check your mailbox settings, before keying in the settings in the editor window.
For those who are using Gmail, here are Gmail's mailbox settings:

Now that you've configured everything, it's time to run Mutt and see the magic of your mailbox unfurl in front of your eyes.
How to Use Mutt on Linux
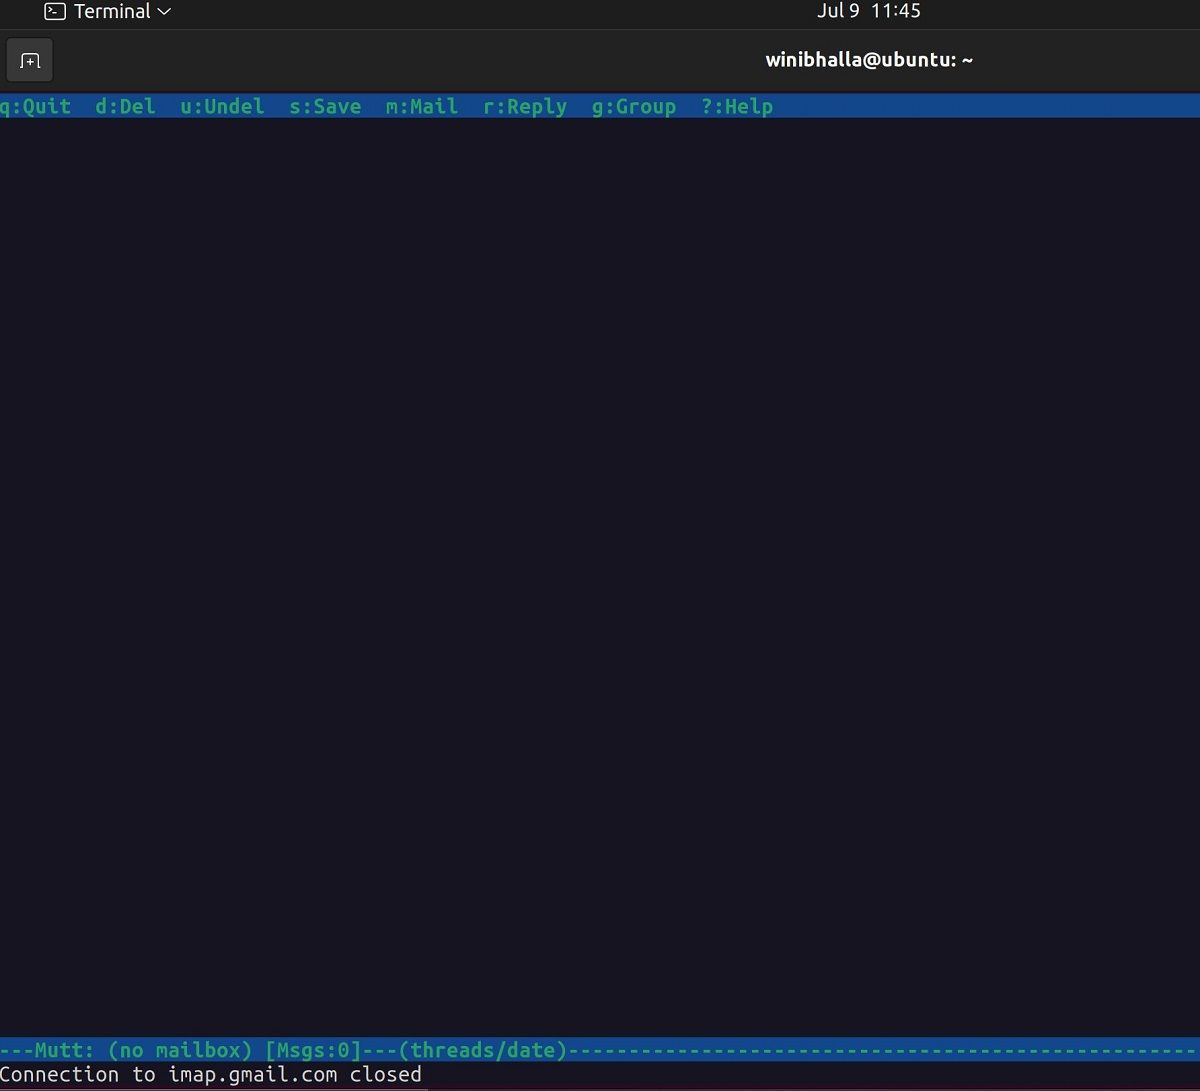
Before you can send and receive emails with Mutt, you'll have to launch the application. Start the terminal and type mutt to launch the application:
muttTo send new emails using Mutt, type m in the terminal. Mutt will ask for the recipient's email address, subject, and message body. You can also attach a file if you want. Once you have updated all the details, press y to send the email.
1. Send an Email With Subject and Body Message
To add the subject string in your email, use the -s flag:
mutt -s "Testing Email from mutt" winibhalla234@gmail.com2. Pipe Mutt With echo
You can implement the echo command with Mutt to pass the message body of the email:
echo "Body Message" | mutt -s "Testing Email from mutt" winibhalla1234@gmail.com3. Send an Email With an Attachment
To add a file as an attachment, specify the path of the file at the end of the command:
echo "Body Message" | mutt -s "Testing Email from mutt" winibhalla645@gmail.com test.txtIf you want to attach multiple files, pass the file names separated with the Space character.
echo "Body Message" | mutt -s "Testing Email from mutt" winibhalla543@gmail.com -a test.tar.gz –a test2.tar.gz4. Send Email to Multiple Recipients
Similarly, you can also add multiple email addresses to send the email to:
mutt -s "Testing Email from mutt" demo1@muo.com, demo2@muo.com, demo3@muo.com5. Add Recipients in CC and BCC Mode
You can use the -c and -b flag to specify the email addresses for carbon copy and blind carbon copy.
mutt -s "Subject of mail" -c ; -b ; mail address of the recipientIn the example below, Mutt will use winibhalla533@gmail.com as the To address, while it will carbon copy and blind carbon copy the email to winibhalla123@gmail.com and winibhalla234@gmail.com respectively.
mutt -s “Test Email” -c winibhalla123@gmail.com -b winibhalla234@gmail.com winibhalla533@gmail.com6. Get Command-Line Help
In case you feel stuck, you can seek out Mutt's help using the -h flag.
mutt -hReviewing Mutt's Email Interface
The menu bar at the very top of the interface window allows you to navigate between the various tabs. The terminal window also lists the keyboard shortcuts right below. The middle pane is for viewing the message(s).

Unfortunately, Mutt does not come with an inbuilt email composer, so you need to use a text editor like Nano, Vim, Emacs, etc to create your message body.
You can use the following commands with Mutt:
- m: Compose a new email
- q: Quit
- d: Delete
- r: Reply
- y: Send
- i: Exit
What’s So Special About Mutt?
Mutt is an open-source package that serves the purpose, is relatively small, and gets the job done. Despite its quick processing and resourceful error handling, it falls short when it comes to displaying images within emails.
Since it's made in a text format to return fast results, some people might feel Mutt does not do the job well for mails with images. Nevertheless, Mutt should be your first choice if you want a command-line email client for Linux.
0 Comments